Are you having a new house built? And do you find yourself asking "Now what were all those things we said we'd get if we ever built a new house?" Well, here's a list of wished-for items that I have compiled over the years - from my own desires and from the comments of others. After having done considerable internet searching on the subject, I feel confident that this is the most comprehensive wishlist/checklist for new homes. Some examples:
Shower valves that have separate hot/cold and volume controls(!) (So the water is not coming out full blast during your entire shower.)
Separate electrical circuits for each bathroom. (So you won't blow the breaker if two people dry their hair at the same time.)
Ceiling lights in bedrooms.
I've also included many items that are a bit more subtle, but which will help eliminate all the little irritations that you might typically have with your home:
Can't easily hang longer curtain rods because there's only one stud on each side of the window. An extra stud on each side of the window would fix that.
The toilet paper holder and towel rods are chronically loose, because sheet rock anchors simply don't hold. Plywood-backed sheetrock would solve that.
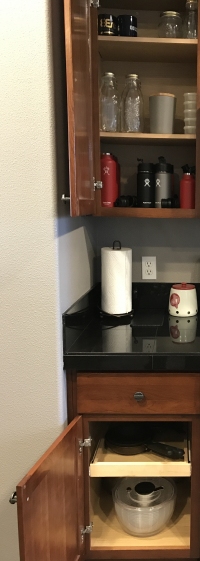
Kitchen cabinets above the refrigerator are virtually useless. What if they were extended outward over the fridge?
The bottom of the cabinet under the kitchen sink has been water-damaged in virtually every home that I have ever lived in! Leaks happen! Waterproof material would fix that.
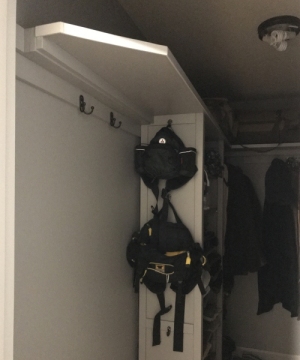
It's always dark in the closets!
It's even darker on the stairs in the middle of the night!
|
The "Wishlist" is offered in the hopes that it will include those things that you find yourself
saying "If I ever build a home, I want this!" Also it includes many items that are difficult or downright impossible to
add once the house is built, as in the first three examples listed above. |
 |
VERY important note:
All this can start to really bump up the price of your home. It might be well to just concentrate on
upgrades and/or changes that can't be done after the house is built. Some builders make a significant profit
on "upgrades", so those that can be done later might be deferred - crown moulding above windows and doors,
exotic kitchen sinks, fancy faucets, and the like. You don't want the price of your home to be excessively higher
than the price of the other homes in the neighborhood.
The Wishlist
Concrete pad extends out from the foundation, perhaps about a foot. This would keep the dirt away from the foundation itself and make it easier to spot insect infestation.
Wood or laminate floors are much easier to vacuum/clean than carpet. And they create a lot less dust. Try not to skimp on the flooring, if possible. The better grades of "engineered wood" and "luxury vinyl" flooring interlock together, and are ususally thicker. Some even have a built-in pad on the bottom for resiliency. Laminate flooring that does not interlock will eventually pull apart and leave small gaps.
Here's a link to types of flooring:
Flooring TypesIf you get carpet, consider "premium" padding. This can make any carpet more luxurious.
Waterproof material on the bottom of cabinets under kitchen sinks and bathroom lavatories. There will be a leak at some time or other!
Lots of towel rods in the bathrooms, if possible. Towels and washcloths will NOT dry on hooks!
Plywood in bathroom walls and closets instead of sheetrock (Or plywood behind sheetrock). (So you can
put towel racks, toilet paper holders, and closet shelves anywhere, and not have to play the "Find the Stud" game!!)
This is also necessary on any wall where you might want a pedestal sink. They require two mounting bolts
that do not line up with typical stud spacing.
Extra stud on each side of windows - so you can hang curtain rods.
Insulation on interior walls around the master and perhaps other bedrooms.
Insulated garage doors are great in colder climates, and for that matter, hotter climates as well.
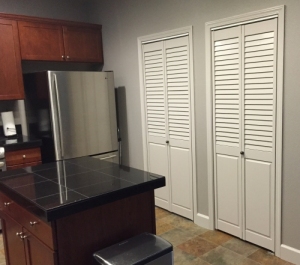
Pocket doors, or louvered doors, are great for closets and smaller laundry rooms. Louvered doors also ventilate closets.
It's nice to have the other bedrooms separated from the master, if possible.
Have a multi-story house that has a garage or basement entrance at the bottom of a flight of stairs? Consider adding shelving at the lowest point. The lowest point in a multi-story house is noticeably cooler than the rest of the house, and these shelves give you the proverbial "Cool Dry Place"!
A covered patio is priceless, particularly in wet or hot areas.
Decent locksets on the exterior doors! Better grade locksets have more metal in the housing. Also consider a single "strike plate" that handles both the bottom knob and the top deadbolt. It comes with 4 screws that are long enough to reach a stud. The standard strike plate is secured with 2 tiny #6 screws into the thin pine door jamb.
For two story houses in climates where you'll use both heat and air conditioning, it's nice to have air flow "dampers" for the upper and lower floor ductwork next to the HVAC unit. Thus, in the summer you can partly close the air flow going to the lower floor and leave the upper floor wide open (cold air falls). And in the winter you can partly close the air flow going to the upper floor and leave the lower floor wide open (warm air rises).
In a related note, try to avoid having the HVAC unit (and certainly the water heater) installed in the attic! They're just too hard to service. (And you won't have to worry about leaks in the water heater in the future.) The garage is not a bad place for both.
While on the subject of HVAC systems:
For about $4,000 more, you can get a "Variable Stage" Heat Pump/Air Conditioner system. This can literally
cut your heating bill in half, AND provide you with a more comfortable heating and cooling experience, without big
swings in temperature. Please see my "About HVAC Systems and Heat Pumps" article. The link is on the Home
Page - just select the "Back" button at the top left of this page.
Extra space in the garage. Having an area that is perhaps 6 or even 8 feet deep on one side will allow you to have a workshop, or to serve as storage for lawn equipment, Christmas decorations, and the like.
If you think you might want to add an attic dormer, or use the attic for storage, you will need stronger rafters. Builders now are using smaller rafters, which will not support anything in the attic. Also, you will need to ask for insulation "batts" between the rafters, not blown-in insulation. As mentioned in the introduction, insulation batts vs blown-in insulation will allow you to get up in the attic if you want to add a light to a room or reinforce an existing light box to support a ceiling fan, or even just inspect the attic.
While on the subject of insulation, ask for insulation with non-flammable moisture barriers. For example, "foil-faced" rather than "kraft-faced" (thick paper) insulation is desireable.
Good attic ventilation is a must in hotter climates.
Consider an "attic fan". These used to be standard equipment in older homes. This is a fan mounted through the ceiling, usually in a hallway. It sucks air from the interior and blows it into the attic. With an attic fan, you can open the bedroom windows and bring in the cool evening and night air. For more Northern climates, this can eliminate the need for air conditioning during warmer periods.
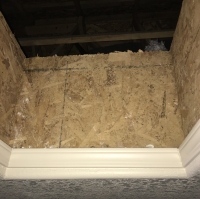
The Crawl Space: Consider having the crawl space lined with an "encapsulation" material. This will be especially useful if you can stand up in some or all of the crawl space. This procedure will be easy to do while the home is being built. A simpler but very effective alternate is to use heavy duty tarps instead of the thin black plastic that is usually used. Having the crawl space well covered will prevent moldy odors being detected inside closets or bathrooms on the lower floors. Indeed, some floor covering manufacturers will not guarantee their product unless the crawl space is sealed.
Painting:
By default, most painters will spray everything flat white! The walls. The doors. The ceiling. Unconnected electrical
wires sticking out of outlets. (Yep. You read that right. It's actually hard to tell which wire is black and which one is white
after the painter's been through!)
So if you want some color, this is the time to ask. If you are good at painting, you might offer to do the painting yourself, perhaps in compensation for one or more of the extras you ask for. But this means you will need to be ready to paint as soon as the sheetrock has been installed and "taped and bedded". You very definitely want to do this before the moulding and trim has been installed. This way, you can simply use a paint roller and not worry about edges.
Also, "satin" sheen on walls stays clean and resists scuffs a lot better than "flat" sheen.
Here's a link to paint sheens:
Paint sheensAnd here's a link to moulding materials and types:
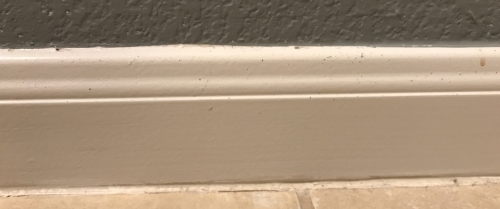
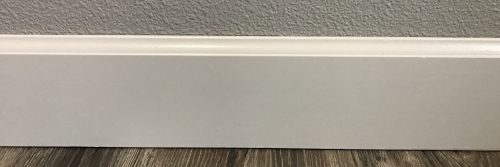
Moulding and trimConsider natural wood moulding. It looks so much better than painted. But painted is fine, too. "Semi-gloss" is recommended for moulding. It resists scuff marks better and is considerably easier to clean. If you have time and are so inclined, you could install the moulding yourself. But this requires a bit of skill and a decent miter saw.
Big time tip: Don't caulk the moulding or let the installer caulk it! Why? Because it then is impossible
to get a nice paint edge between the wall and the moulding if you paint later. The caulk is simply too irregular. Further,
it makes the moulding very difficult to remove, if you replace it later or get a new floor.
To stop drafts on exterior walls, simply ask the contractors to caulk the bottom of the sheetrock where it meets the floor,
before they install moulding.
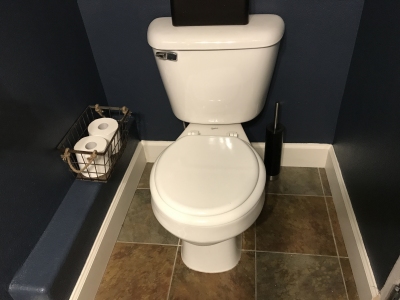
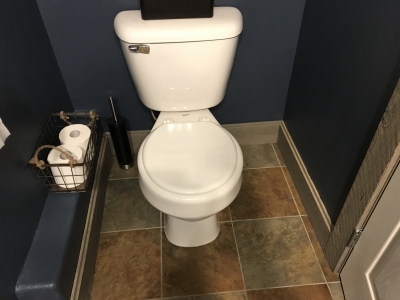
And don't let them caulk the toilet, either! Caulk is bad! It makes the toilet hard to remove if it has to be reset, and the caulk will hide leaks - the water may seep under tiles or flooring and you won't know it.
Side Note: Moulding and CaulkMoulding is supposed to cover the transition from the wall to the floor. The moulding nicely covers the
irregularities and gaps between the wall and the floor, or perhaps the gap between the wall and door jambs.
In a brand new house, uncaulked moulding looks great, with a nice sharp edge between the painted
wall and itself. |
|
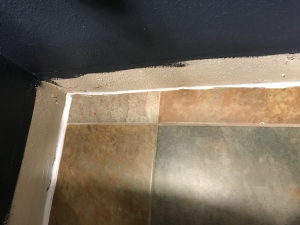
Here's an example, from a home built around 2005. The moulding here is no longer serving to make the transition from the wall to the floor look sharp. Indeed, we see that the problem now is how to contend with the transition from the wall to the moulding itself, as well as the transition from the floor to the moulding itself! |
If moulding has been caulked, the only way to make it look good again is to remove it, scrape and sand
off all the caulk, and repaint it. In my house, I had to remove all the moulding in preparation for the floor installers.
Since the moulding had been caulked, removal was extremely difficult.
But once it was removed, I could sand and repaint it. The resulting flawless edge is worth the effort. |
 |
 |
 |
For exterior walls, you, (or the contractor) can caulk the sheet-rock-to-floor gap first, and then install the moulding. |
If you want a really nice appearance, ditch the painted moulding and opt instead for some sort of natural wood moulding. Here's a small 1/2 bath on the lower floor with the original moulding. |
And here it is after I replaced the original "builder white" moulding with "Montana Ghostwood", which is a stained wood from trees that had been killed by the Pine Bark Beetle. |
 |
 |
The laundry room:
The space for the washer and dryer should be 2 or more feet wider than the combined width of both machines, if possible. Why? Because you cannot connect/route the dryer vent unless you can reach it from the side!! Mine is 64 inches wide, which leaves about one foot of extra space. About 76 inches would seem to be about right. That gives you 2 feet to squeeze in and reach behind the dryer (if both machines are temporarily moved to one side).
Drain pan for the washer and/or floor drain for the whole room. This is discussed in more detail under "Plumbing" below.
Hanging rods in the laundry room
Maybe a sink. Great for rinsing muddy clothes.
Maybe room for an extra refrigerator or freezer, if the laundry room is close to the kitchen.
This is a good room for the louvered or pocket door.
|
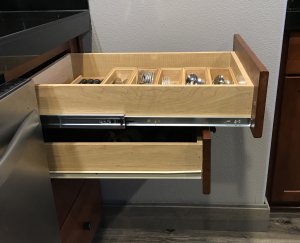
The kitchen: Cabinets above the refrigerator extend out, so they're easier to reach. Having lots of drawers is handy in the kitchen. Garbage disposal. Although many will disagree with me, consider eliminating the garbage disposal! Why? Beacause they become a source of odors, and have to be deodorized from time to time. Simply get a coarse strainer for the kitchen sink drain. When you rinse your dinner dishes, the strainer catches all the big particles and you toss them into the trash. I have a big composite granite sink with no divider - just a single drain in the middle. This drastically simplifies the area in the cabinet underneath - there's much more room as well. Full length drawer slides in the kitchen. Maybe in the bathroom too.(SEE
the image on the right). The image shows an example of the extra drawer length that is provided by "full extension"
drawer slides (top) vs the standard issue "Euro" drawer slide (bottom). Indeed, with standard
drawer slides, the back 6 inches of the drawer is essentially lost! (And full extension drawer slides
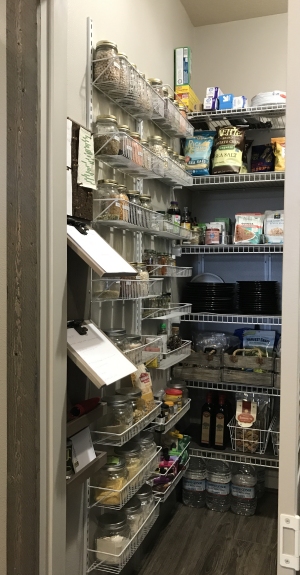
have ball bearings, imparting a nice quiet, luxurious operation.) Both electric and gas connections at kitchen range. This helps on resale, and it helps if you change your mind. Do you grill a lot? Consider a gas line to the back porch area. Possibly group the oven and the microwave oven in a stack, with a separate cooktop stove. Over-the-range microwave is a flawed idea! You are reaching awkwardly over the range every time you cook something, and it's hard to see inside to watch for boilovers. Furthermore, if you drop a heavy pyrex dish onto a glass-topped range, you'll have to replace the top or buy a new range! It's really nice to have decent-sized counter space on each side of the cooktop/range. A kitchen island can make up for limited counter space in the rest of the kitchen. Size the island as generously as possible. A pantry!!! This can take the place of many cabinets! Also, wooden shelves are much more usable than the wire mesh shelves. (You will soon get real tired of small bottles tipping over when you put them on the shelf. Also, the wire mesh shelves sag when you place heavy items like dishes or canned goods on them.) |
 |
Side Note: Pantries vs Cabinets |
||
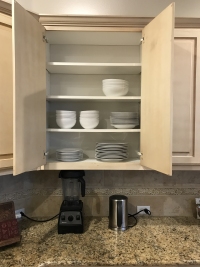
Here's an extended height cabinet in a house with 9 foot ceilings. It has 4 shelves instead of the usual
3, but as you can see, only the first 2 are useable, and you are reaching over the counter to reach even them. |
This is one of the cabinets in my kitchen. You can see that the top shelf is good mainly for storing
things that would not normally be used at all, and the second shelf is only slightly more useable. |
On the other hand, here's the shelves at the back of our pantry - about 3 feet in width. They're
easily storing all our dinner dishes, along with chips, grains, pasta, crackers, snacks, olive oil, along with various
larger items on the floor. |
 |
 |
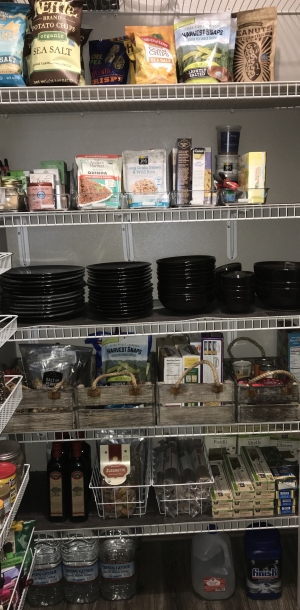 |
Bottom line: If you have the space, consider a walk-in pantry.
It can take the place of 10 or more cabinets! |
||
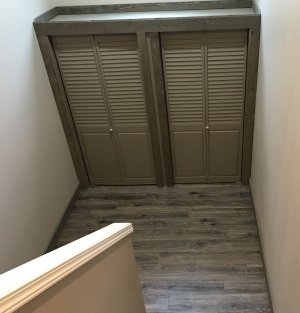 |
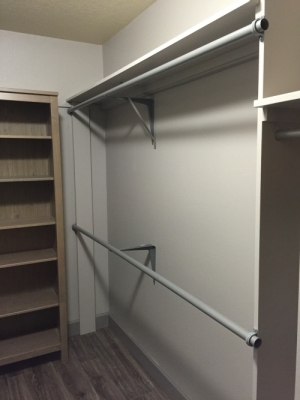
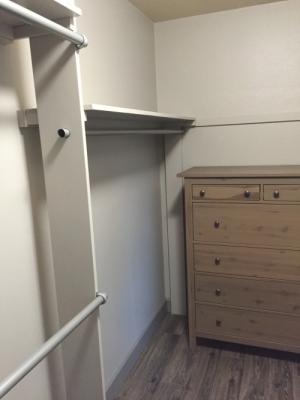
Storage!!: Possibly modify a floor plan to allow a closet to be along an entire wall. Modify floor plans such that closets extend into the bedroom, if possible, particularly with larger bedrooms. Use the space under stairs. Extend or widen the garage, if possible, to allow for a work area and/or extra storage. Install shelves just below the ceiling along garage walls. (SEE image on the left) Is there a wide hallway? Consider a storage area here. Closets: Consider having one side be double rods, so that you can put twice as many shirts. Closets: Have the top shelf be deeper than the standard issue 12 inches. This way you can put longer items on the shelf without overhanging. Wood shelves are much more convenient than the metal grid type shelving. Ask the carpenter to sand rough edges before painting. (Some of them just leave edges unfinished.) Linen closets: Have the door be almost as wide as the closet, if possible. At least use a 36 inch louvered door instead of the standard 24 inch. Why? So you can more easily put up towels/sheets on each side (the frame isn't in the way!) A pocket door entrance to the bedroom might allow a closet to be bigger. |
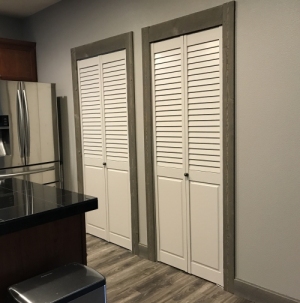
Louvered Doors Save Space. Also, some closet options. |
||
Here's the laundry room and pantry in my (pre-owned) house. Note that the doors open into each room
- taking up valueable space. |
And here are the same two rooms after adding louvered doors (and painting the moulding - and the louvered doors - something other than "builder white"). |
Side Note: (Natural wood moulding again) |
 |
 |
 |
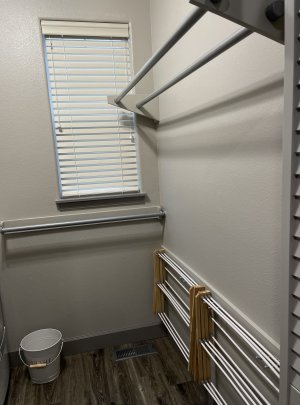 |
What did the louvered doors buy me? Well, I could now add a laundry rod along the entire wall of the room, along with space to hang the laundry drying racks. (Another rod is along the back wall.) And in the pantry, I could add racks for spices and bottled items (like beans), along with a grocery list holder and bulletin board. |
 |
|
This picture of the master closet shows the idea
of double rods. My wife's blouses and shirts can hang from these two rods, in half of the horizontal space. |
In the other half of that side of the closet, I used a single rod, for pants. Also, I added a shelf right above the rod. |
 |
 |
 |
Electrical:
Separate circuit for each bathroom! Don't let the builder put one GFCI for both bathrooms. Why? If two people dry their hair at once, the circuit breaker will blow.
Built-in electrical wall heater in the bathroom(s) - in colder climates.
This is a good time to ask for quiet exhaust fans in the bathroom and laundry!
In large bathrooms or those with two vanities, consider two separate lights on the wall rather than one long light. Why? Because there are lots of choices of fixtures for 2, 3, or 4 lights but few choices for fixtures with 5 lights or more.
Electrical outlets in corners of bedrooms, preferably one on each side of the corner. Or at least have the outlets in the corners in the place where the bed/nightstands will be.
Electrical outlets in the kitchen island, preferably on its own separate circuit.
Circuit for lights under the kitchen upper cabinets.
There should be at least 2 separate "small appliance" 20 amp circuits in the kitchen. It there is an island, it might be a separate circuit too. Why? So you can operate the toaster oven and the coffee maker or Instapot at the same time.
Possibly a separate circuit for TV and audio/visual equipment, possibly with surge protection at the breaker box. Maybe even have 2 or even 3 outlets ganged together for this equipment.
Do you have any 220V tools, air compressors, portable heaters in the garage? Thinking about getting an electric car? (Actually, they're becoming more and more common.) Then ask for a 220 outlet in the garage.
Extra lighting in the garage is nice, too. Put several light boxes in the ceiling, as well as above the area where you are likely to have a workshop. Also extra outlets in the workshop area, as well, perhaps higher up on the wall to accomodate a workbench. Consider also a separate light box and switch for just one light. This is for those times when you bring a bag of trash down to the garage and don't want to turn on all those main lights.
Low voltage wires for the garage door opener! These wires are always stapled to the ceiling and walls after the garage is sheet-rocked, and usually don't look professional at all.
Ask for "Weather Resistant" grade for all outside outlets. You won't necessarily
get them automatically. While the builder will use an outdoor enclosure with a cover for outside outlets,
the outlet receptacle itself likely will be just indoor grade. Weather Resistant will have an embossed
stamp "WR" on the receptacle itself. (This is actually a code requirement!)
As a matter of fact, you could ask for Weather and Tamper Resistant. "Tamper Resistant" means
there are little plastic doors covering the plug slots. They're supposed to keep kids from shoving objects
into the plugs - but they do make it a bit harder to plug things into the outlet. However for outdoor use, they
will help keep the insects/dirt out of the plug slots, and this might make up for the slight inconvenience.
I was going to suggest using a better grade of "Romex" electrical cable. The standard
issue Romex (type "NM") has a relatively thin sheathing, and the conductors - while individually wrapped -
are separated by paper! But there aren't any better grades. There is a "UF" type,
which is outdoor grade and has thicker insulation. But I bought a small roll and found that it is very
stiff and extremely hard to strip.
But do note that "NM-B" has a higher temperature rating than "NM".
But you can ask for a better grade of the indoor electrical outlets. Builders will typically use the $0.60 cheapies. The "commercial grade" outlets will have stouter mounting tabs to resist flexing when something is plugged into them. Also the internal contacts will be more substantial, providing better connection.
Further, there are actually higher quality cover plates available as well. These will have a stiffer plastic or nylon material, and won't deflect with the attaching screws. There's even a "medium" size, which extends outward about 3/8 inch more.
If you have a bathroom with a separate toilet closet, add an outlet here, for a night light. (Don't want the Booger Person to sneak up on you while you are at your most vulnerable!)
Lights in the closets
Lights in the bedroom ceilings (not just a switched outlet that you have to plug a lamp into). Or light/ceiling fan combos.
Lights on stairs!
Ethernet and Home Theater:
You want to have Audio/Video and Internet wiring installed while the house is being
built, because it's VERY DIFFICULT to add these wires later.
Decide where you want to have the internet modem and wireless router to be. The wireless signal will be
better if this is in a central location. Ours is in a stair landing midway between the floors. Have a cable
run from there to the garage or point of entry from the service provider. This is usually "RG6" cable.
The other wires that terminate here are the "hardwired" Ethernet cables from the various rooms.
These are "cat5e" or "cat6". A typical wireless router - in addition to providing a wireless signal - usually has
4 jacks for connecting these hardwired cables. It would be nice if the installer terminated each cable in
a wall plate with the "RJ45" jack, but at least have them bring the bare wires up, put them in 4 boxes or at
least one box, and label which room each cable goes to.
What are some possible locations to have "hard-wired" ethernet jacks?
One is in the living room/family room where the "Smart TV"/box will be. This is important!
Hard wired" ethernet is considerably faster than wireless. If you have a hard-wired TV, when you
open Netflix/Prime/Disney, you'll get the "Who's Watching?" question almost instantly!
Other locations are in the master bedroom, in the office, and any other room where
a computer is likely to be placed. You will be amazed at how much faster the internet will be through a
hard-wired connection. These wires should also be terminated - again if possible - in "RJ45" jacks and
wall plates.
Have a home theater system, or thinking about one? Run speaker wire (or any 16 guage
"zip" cord) to handle some of the extra speaker locations.
Thus, for example, the main left/right/center speakers and the woofer probably won't need wires
in the wall; they can be connected directly. But consider running a wire to a spot somewhere in the center
of the left wall, and another wire to the right wall ("left" and "right" considered as if you were facing the
imaginary TV). These will be for the "surround" speakers. Also consider running wires up the "TV" wall,
terminating at the top of the wall, on the left and right, about 4 feet from the corners. These will be
for the "height" speakers, to take advantage of the new Dolby "Atmos" feature. These two sets of wires
originate in a box near the electrical outlet box(es) for the equipment. You should leave a coil of extra
wire at each termination point/box. (wrap them in a bag so they won't be painted white!)
Why all this detail on ethernet and home theater wiring? Because it is next to impossible
to add wiring after the home is finished!!
Plumbing:
Just as a note (so you'll sound like you know the biz), plumbers refer to the bathroom "sink" as a
"lavatory", or just "lav". The only "sink" in the house is in the kitchen and possibly the laundry.
Try to get the highest quality bathtubs and/or shower stalls. They're almost impossible to replace later.
As noted above in the first few paragraphs of the "Wishlist", if you plan to have a pedestal lavatory in any bathroom, some 2 x 8 pieces of wood need to be placed between studs to handle the mounting bolts for the lavatory. The top of these wood pieces should be about 36 in above the floor. Or as a alternate, have the builder put 1/2 in plywood behind the sheetrock on the wall.
Removeable drain strainers are highly desireable in bathroom lavatories, showers, and tubs.
Ask for a drain pan for the washer. Then you don't have to worry about water leaks. This should be connected to the drain system or have a pipe that goes through the wall to the outside. Make sure the drain pan is not positioned right next to the wall! Why? Because washing machines usually have to be about 8 inches away from the wall to allow for the hoses. This fact rendered the drain pan useless in my house, since the front of the washing machine hangs over the edge, and the pan doesn't move.
Alternatively, consider a floor drain for the whole laundry room.
Drain pans with pipes are required for water heaters, though possibly not if they are in the garage.
The laundry room really belongs on the lower floor of a two story house.
Shower valves that have separate hot/cold and volume controls(!) (So the water is not coming out full blast during your entire shower.)
"Instant", or "circulating" hot water. This is not actually a pump or something like that. It's simply an extra pipe connecting the water heater to the fixture that is furthest away from the water heater. So for example, after all the piping is finished, the plumber adds a separate pipe to a "tee" at the upstairs bathtub or lavatory. This pipe is run back down to a tee of the pipe that comes out of the water heater. This creates a "loop", resulting in much faster hot water availability.
Insulated hot water pipes! This way, when you draw hot water at the kitchen sink, and then draw some more, say about 30 minutes later, you won't have to wait until the water warms up again.
Ditch the garden tub/jacussi, unless you want it. (Unless of course you want a garden in the bathroom!) This space could be used instead for an extra linen closet.
Taller lavatories in bathroom. This is a lot easier on one's back. The kids can use stools.
Why are toilets right up against the wall?? Some are so close that the lid doesn't even fit. And you can never paint the wall behind the toilet, nor can you put somewhat wider shelves above it. Consider having the "rough-in" drain one or two more inches out.
Copyright © 2019 J.A.