This article (8/2026) applies to the latest IOS 26 release, as well as to IOS 17/18.
Apple has done a decent job of easing the transition from an older iPhone or iPad to a new one. Their setup process is (mostly) seamless.
But it's what you do before and after
that can get problematic!
Among other things, don't delete/reset the older device before you are finished setting up all the apps
on the new device! Why? Because apps like Gmail with two-factor verification can not send a verification code if
the older device has been reset!! You will find yourself in "Password Hell"!
This is particularly true if you have purchased two devices at once, for example a new iPhone and a new iPad.
What to do Before Starting the Setup/Transfer Process
1To speed up the transfer, delete all unnecessary data:
You can get an idea of the time required to transfer your existing data to the new device
by checking how much storage has been used on your existing device.
This is Settings. . .General. . .iPhone Storage.
Decide what to do about photos. SEE "Handling Photos. . .More Information" below.
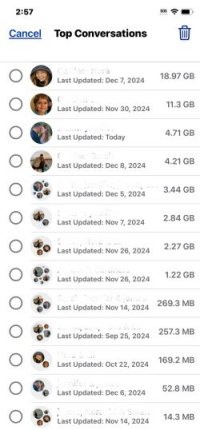
Clean up all your Messages and remove their attachments. SEE "Checking Storage. . .More Information" below.
Remove unused/undesired apps.
2Make an iCloud backup. This way you know that all your latest notes, contacts, music, and the like, will be available from the iCloud servers when you transfer your data to the new device.
Have too many photos and/or music? Then you can possibly take a chance and skip the iCloud backup and just start the setup and plan for a long transfer.
3Make sure the old iPhone is ready.
Make sure your battery is at least 50% charged.
Make sure wireless AND Bluetooth are on.
If the Setup hangs or just stops, you might have to install the latest IOS on the old phone.
Apparently the IOS versions must match on the old phone and the new phone.
NOTE:Setup won't say this. It will just stop!
Find your AppleID password. You'll need it countless times. NOTE: "AppleID" has been
replaced by "Apple Account"! (You just didn't get the memo!)
Performing the Setup/Transfer Process
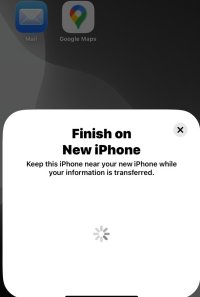
1Initial Steps Turn on new device. It "should" have sufficient battery charge to do the entire operation. Our new iPhone 16 had 75%. After you select the desired Language, Region, and Appearance, the "Quick Start" screen appears. "Quick Start" begins to search for other devices. "Set up new iPhone" appears on original phone. Select "Continue" Aim old phone to the animated blue fuzzy area which appears on the new phone. Once it is captured, the new phone says "Continue on your other iPhone". Select "Set up for me" on old phone. It will then say "Finish on new iPhone" (Image on right) new phone asks your Passcode. new phone asks if you want to turn on Location Services. The process seems to be more stable if you say "Yes". You can turn off Location Services later if desired. |
 |
2The data transfer
This is where the new phone just might cancel the data transfer and just say "Reset". If this happens, you must install the latest IOS on the old phone. Does it say this? Nope.
2aThe data transfer (whether or not you had to stop and install the latest IOS)
(You may have to stop and restart the new phone to get back to the Setup proccess.
Scenario 1: My phone had very little data, and no "syncing" to iCloud. It transferred in 2 minutes and went to the next step.
Scenario 2: My wife's phone had many photos and used icloud. It hung up on
the transfer. It indicated "Time remaining: 7 hours". And the time increased! After a bit, it said 9 hours.
I cancelled the transfer and tried again. This time the new phone gave me a
choice: "Transfer settings and/or data". I selected "Settings", and it indicated "From iCloud", and took 2 minutes. Then it
said "iPhone will transfer data in the background." Then the device may suddenly go blank. It is doing a restart. This may
happen more than once. Will it say "Restarting"? Nope.
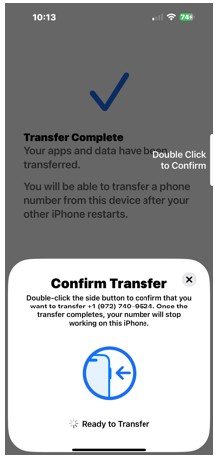
3Transfer phone number. The new phone should then say "Trying to reconnect. To begin transferring phone numbers, keep your phones next to each other and unlocked." The process may hang up. If so, check "Set up later in settings." If not, the new device will say "Phone number". After a bit it will display a strange animated icon
on the right side: a white rectangle that moves from left to right with the words "Double click this".(Image on right) If the device hung on the attempt to transfer the phone number, restart it. At this point you
"should" be able to see your normal Home screen and can go to Settings. |
 |
Well, that's it!
You can now set up all the things for which you said "Set up Later."
TIP: If it goes South on you, you have a second chance! Just select "Restore to Factory Defaults" on
the new device to start over.
For information on lots of settings that will lessen battery drain, please see "Jimmie's
iPhone Battery Optimize" article. Select the "Back" button on the top to go to my Home page, where you will find
the link to the article.
Handling Photos. . . More Information
1 If you do not have "Sync photos to iCloud" turned on and you
typically transfer your photos to a Mac or a PC, then transfer all remaining photos to the Mac or PC. Then you
can delete the photos on your device if you want the transfer to go faster. Of course, if you want your
photos to transfer to the new device, then just leave them. But you still may wish to transfer them to the Mac or PC
first, just in case something goes wrong.
2 If you do have "Sync photos to iCloud" turned on, another
option, called "Optimize iPhone Storage" is usually turned on by default. This causes all your photos to be replaced
with low-res "thumbnails", which take up MUCH less space. So these should transfer very quickly. (The full
resolution original is automatically downloaded from iCloud if you select one of the photos for editing or sending
in messages).
Note that you will have to leave "Sync photos to iCloud" on before the transfer. Why? you ask. Because
if you attempt to turn off "Sync photos to iCloud", you will get two choices:
"Delete all photos on this device", OR
"Transfer all photos from iCloud to this device."
Thus, you will want to wait until the transfer is complete before turning off "Sync photos to iCloud".
Important note: After the transfer, when preparing your old device either for trade-in, donation, or
(as we have done) using it as a great MP3 player, you want to UNCHECK "Sync photos to iCloud" prior to deleting
all the photos on the old device! If you delete all the photos on the device with "Sync photos to iCloud"
still on, your photos will be deleted on iCloud and all your other devices! (You will at least have 30 days to recover
the deleted photos if you have done this.)
iCloud is a "SYNC" system, not a "BACKUP" system in its default operation.
Checking Storage. . .More Information
You can get an idea of the time required to transfer your existing data to the new device
by checking how much storage has been used on your existing device.
This is Settings. . .General. . .iPhone Storage.
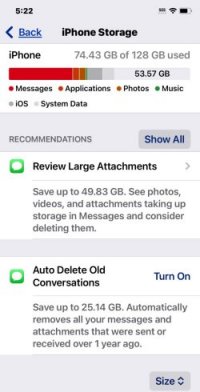
The first screenshot below is the iPhone storage data for my wife's iPhone XS. Note that the biggest
chunk by far is Messages! It's the first red bar. Applications and Photos are the two much smaller red bars.
Surprised? That's because of the "Optimize iPhone Storage" setting, since she had "Sync photos to iCloud" on.
The photos were in lower resolution and thus much smaller file size.
On the other hand, message attachments/movies/photos are stored in full resolution.
NOTE: These screenshots were from my original article on iPhone setup. When I updated this article in 2026, my wife's iPhone 16 showed MUCH less storage for photos. We had set "Optimize iPhone Storage" to ON.
Under the Storage display is "Recommendations".
The first recommendation is to "Review Large Attachments." Note that this is showing that, of the
74.43 GB used under "Storage", 49.83 GB is Message photos, videos, animated Gifs, and other
attachments. |
 |
This does not work: |
 |
This doesn't work either: |
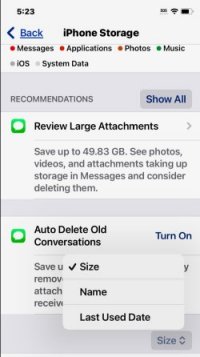 |
This works!! |
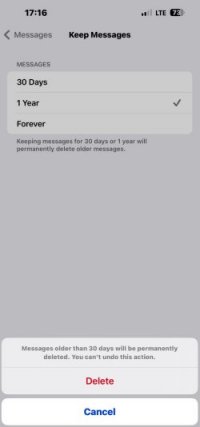 |
Note that we have gone from 74.43 GB to 28.75 GB of data. This will make the transfer go MUCH faster. |
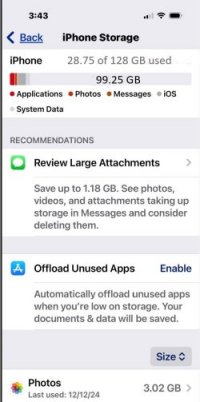 |
This is an image of an older iPhone XS after all the transfers
were finished. |
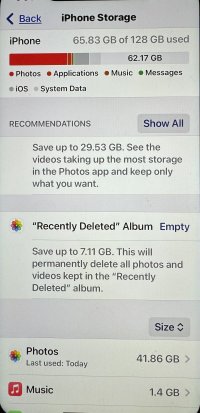 |
A note on "Reset to Factory Defaults".
When you get ready to prepare your device for trade-in or donation, you can select "Transfer or Reset
iPhone/iPad". This is under Settings. . .General. . ."Transfer or Reset iPhone/iPad". Select "Erase all Content
and Settings"
You will be asked for your "Apple Account" password. This is your "AppleID" password. When you enter
the password, nothing happens! The program gives no indication that it is actually doing something. This
caused me to think that the I used the wrong password (this was before I learned that "AppleID" is now "Apple Account").
I actually contacted Apple support, and the agent screen-shared the process. Even the agent thought that the
program was hung up! When we tried it again, I noticed that one of the categories ("Apps and Data", "Find My",
"Wallet", etc) had been deleted. Only then did I conclude that the program was in fact doing something!
Copyright © 2026 J.A.