As we all know, security is the biggest source of hassle and frustration in using internet
sites. Well, it's worse if you are trying to create a web site. What I am talking about here is the SSL security certificate
process. Buying and installing a new SSL certificate manually can be extraordinarily difficult, leading you througth what I call
"Complexity Hell". Renewing or Reissuing one is just as bad, if not worse.
So the intention of this article is to guide you through an easy method to buy or renew an SSL Certificate.
It is specific to those who use Namecheap Hosting, since they have a very good, if somewhat hidden, purchase/renewal app.
Other hosting providers likely have something similar.
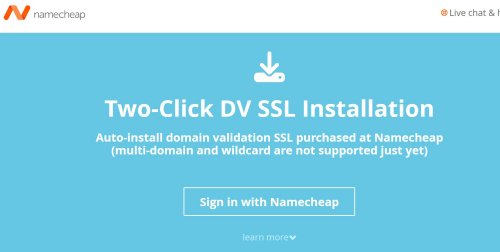
I will refer to this as the "Easy Renewal" tool
But first, some clarification about dealing with SSL Certificates.
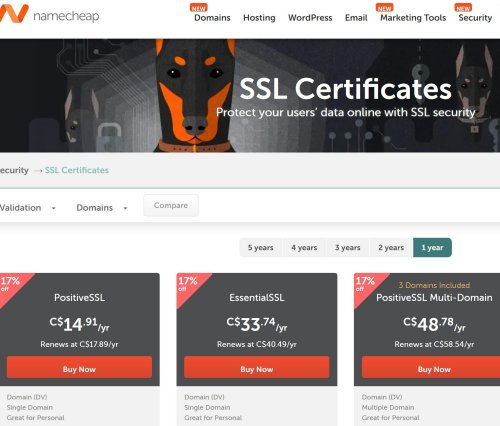
One supplier of SSL Certificates is Comodo. Namecheap uses this company for its SSLs.
Two common SSL Certs from Comodo are "PositiveSSL" and "EssentialSSL". The Positive SSL is about half the
price of the EssentialSSL. For simple web sites, even those who have some "e-commerse" (shopping carts and the like),
the PositiveSSL Certificate is plenty. These two SSL certs are "type "DV" (Domain Validation).
More elaborate (and expensive) types are "OV" (Organization Validation) and "EV" (Enterprise Validation).
You can usually purchase SSL certificates for 1 year or up to 5 years.
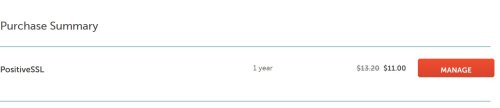
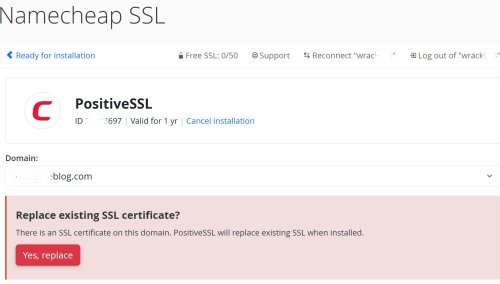
"Renew". You can renew an existing SSL by buying another one to replace it. It is best to wait until the SSL is under 30 days before expiration. This way, the remaining time left on the existing one will carry over, whereas you may lose the remaining time if renewed prior to the 30 day expiry.
"Reissue". If you have a multi-year SSL, you can reissue it each year. But often this "reissue" process involves going through the "Complexity Hell" method.
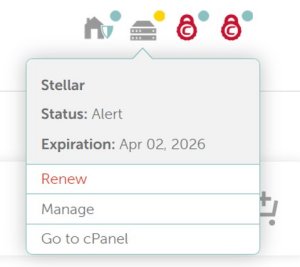
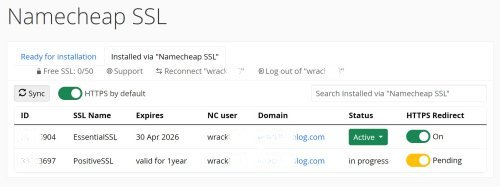
Notes specific to Namecheap. You can use the Easy Renewal tool to renew, but not to reissue,
your SSLs (as of March 2026). You can reissue multi-year SSLs through Namecheap for "free", but you're faced with the "Complexity
Hell" process. The the "easy renewal" tool only works for 1 year SSLs, according to Namecheap's Youtube video, 1/2023.
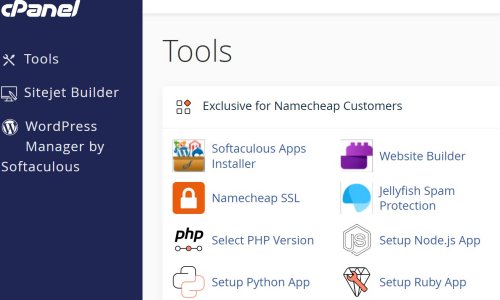
The easy renewal tool is in your "cPanel". For those who are new at this sort of thing, "cPanel" is one
of several industry-wide methods of handling various aspects of your web site. For example, you upload your web pages
using cPanel. cPanel is independent of the Hosting site.
So the upshot is this:
If you want to have a hassle-free, inexpensive way to maintain SSL Certificates, and you use Namecheap as your
Hosting Provider, buy a PositiveSSL and renew it each year using Namecheap's Easy Renewal tool.
This article explains how.
NOTE: SSLs are about to go to a 200 day cycle instead of the current 1 year cycle. I don't know how this will be handled. Recent Namecheap articles suggest that they will provide an automated method to service their renewal. That is, you can in principle purchase 1 to 5 year SSLs and use this method to reinstall them every 200 days. If that is really the case, and if the reissue is no charge, then you can maintain your SSLs without the hassle of manual methods. Nonetheless you might find this article to greatly help you buy your first SSL.
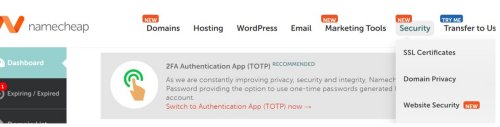
Buying or Renewing an SSL Certificate through Namecheap.
|
|
|
|  |
|
|
 |
 |
|
|
 |
 |
|
|
 |
 |
|
|
 |
 |
|
|
 |
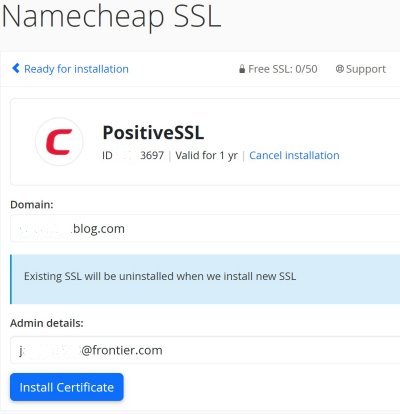
NOTE: When you purchase a new SSL from
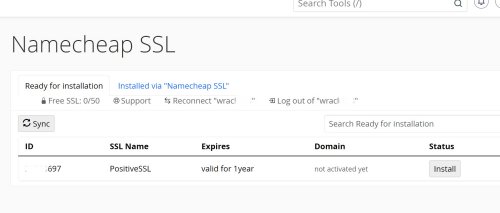
Namecheap, you "should" get two emails from Comodo/Sectigo: the CSR (Certificate Signing Request), in text form(!) an attachment with a ZIP file containing: my_blog_com.ca_bundle (where "my_blog_com" is the name of your web site). my_blog_com.crt The placement of these files is handled automatically by the Easy SSL Tool. |
Some Notes on the Manual ("Complexity Hell") Process
Even though Namecheap has a very good "Easy SSL" tool, many links on their site or in
their email notifications leads to the manual procedures, aka "Complexity Hell".
Why is that? I finally began to understand that Namecheap (and likely other hosting services), allows for
the SSL Certs being purchased elsewhere. It was this email instruction that made this all clear:
SSL Certificates:
If you've purchased an SSL certificate, you will need to enable the SSL on your server.
However, if you purchased a renewal PositiveSSL or EssentialSSL for a domain on Namecheap Shared
Hosting, it should be installed automatically within an hour of the purchase.
So that probably accounts for the conflicting instructions/links to the installation process. Nonetheless, even if you purchase an SSL through Namecheap, you are still not directed to the "EasySSL" tool. See step 3 above: "Do not use this link!"
So, how bad is the manual procedure, and why do I keep dissing it? That's because it's one of "those" sessions with high tech: You try to follow documentation that does not really tell you what you really have to do, leading to many failed steps, until you just keep trying things until it finally works. . . But you have NO idea what you just did that actually did work, so that you can't even make decent notes for future reference!
So here's a step-by-stumble sample of the manual process.
 |
This example is my "EssentialSSL from 2023. |
I was led here. It assumes that you know what the CSR
(Certificate Signing Request) is, and futher, that you have actually procured one. | 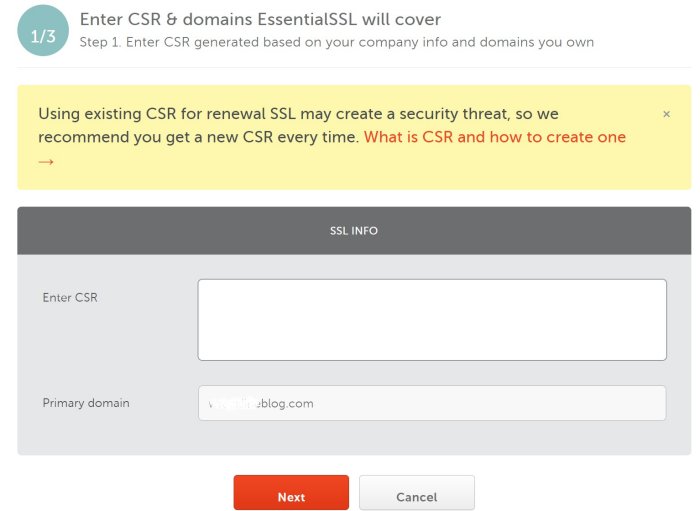 |
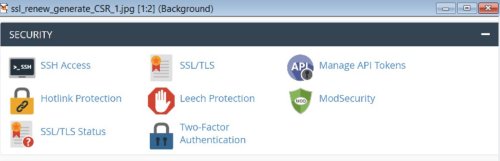 |
After I found out the what actual sequence really is(!), I went to the "Security" tab on my dashboard and selected the "SSL/TLS" button. |
In the SSL/TLS form, just take the default and select "Save". NOW you can find the form shown above, labeled "1 / 3" and paste your CSR file into it. |  |
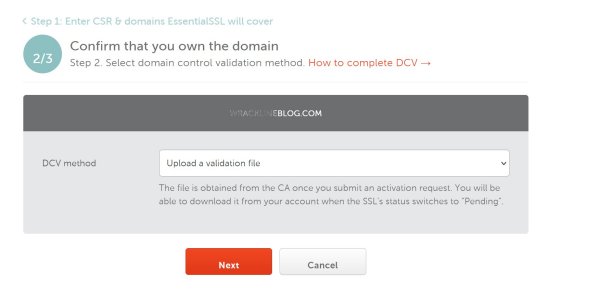 |
This is the "Domain Control Validation". It is labled "2 / 3"
(step 2 of 3). You are being asked to prove that you are the Domain (web site) owner. |
This shows the top part of a large form titled "EssentialSSL/
PositiveSSL for my_blog.com",
This is from the documentation. The real page does not have the blue dots. |
|
 |
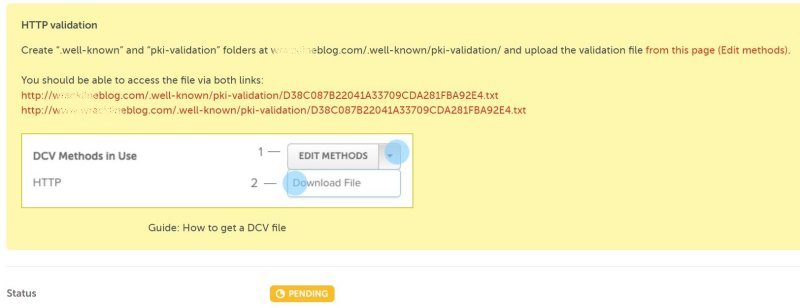
Here's "Step 3 / 3", although it may have taken you 10 steps to
get here. |
Clicking "Submit" above "should" yield this page. It also "should"
yield a Winzip archive (my_blog_com.zip) with three files: |
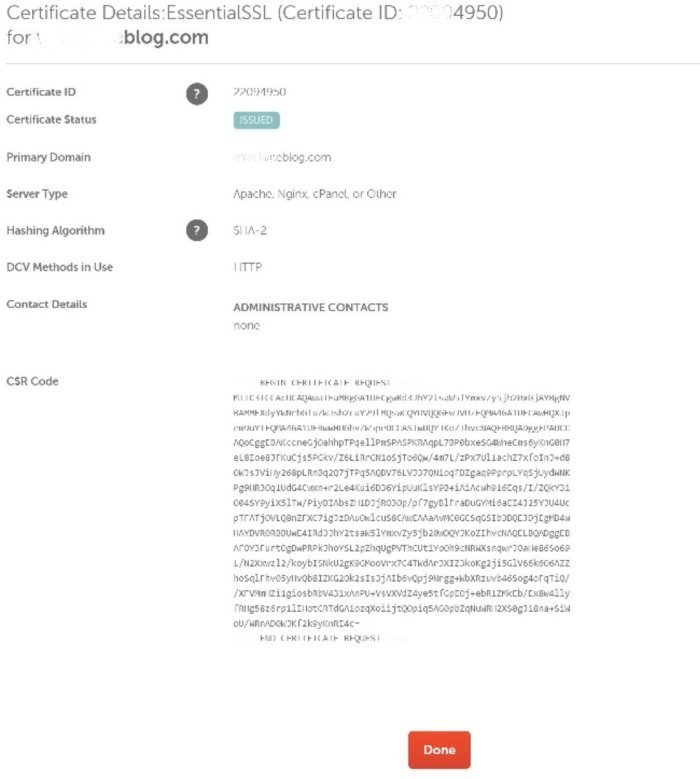 |
You're finished! You have passed the "Complexity Hell" gauntlet. If the steps above
are confusing, that's because of the reasons I have outlined above: I did all this, but really have NO idea
how I got to some of those pages! To write this article, it took every bit of 8 hours to try to sort through all my
desparate notes on the events that transpired on my two journeys through the gauntlet!
Caution: If you are (trying) to navigate the gauntlet, BE CAREFUL. Why? Because it can lead to forms
that involved purchasing another SSL!
All of this is why I am more than willing to pay for a "renewal" of a PositiveSSL (about 12 bucks) each year,
and use the EasySSL to install it.
Copyright © 2026 J.A.