Have you recently watched a movie on the "Big Screen" at a local theater? Want to create an environment in your own home that will be like that? Not only can you do that, but it's not all that hard to create one that is even better! And why is that?
The Big Screen theater has to try to provide a realistic experience for about 100 people. So it likely has 40 - 50 speakers. The "soundfield" in that environment is hopelessly muddled.
You have 2 to 9 speakers. The audience is just you and your spouse and maybe the kids. So you can literally tune the optimum sound for the living room couch. Dialog will be sharp, and special effects will be authoritative rather than just loud.
A halfway decent 50 - 75 inch TV will have a significantly clearer image than a 30 foot screen.
And the most important reason your home theater is better: You can pause the show so you can go pee or get a glass of wine or another beer!
And what are the impediments that are keeping you from doing that?
The Buzzwords, for one. 5.1 vs 7.1. vs 5.2.2. Dolby Atmos. DTS:X. HDR, 4k/UHD,
HDCP 2.2. Blah, Blah, Blah.
We can fix that.
|
The technical difficulty of setting up all that gear and getting it right. The ability to get control of the minimalistic "smart" remote that comes with a Smart TV,
and get it to do exactly what you want in a halfway predictable manner. Money. Over there on the right is an excellent book that will provide great detail on all the home theater terminology, along with its history and evolution. The book provides tips on buying all the equipment and also on setting it up, and it is updated annually. I read and re-read it during the Christmas holidays prior to setting up my system, and highly recommend it. And lastly, the first thing you will likely want when you are finished setting up your own Home Theater system is some serious eye and ear candy! So I have included (at the bottom of the page) some selected movies that will provide just that. |
|
The Buzzwords
Video
4k/UHD: "4k" and "UHD" mean the same thing. These refer to the clarity of the picture.
UHD means "Ultra High Definition". This became available somewhere around 2013. The "4k" means UHD, and is about
4 times the resolution of "HDTV". (Or it can mean that there are approximately 4,000 horizontal pixels.)
High Definition is 1920 x 1080 (approximately 2 million pixels)
Ultra High Definition is 3840 x 2160 (approximately 8 million pixels)
HDR: (more recently "HDR10") This is "High Dynamic Range". This means essentially the same thing it does in photography. Some cameras and smartphones can take three pictures of the same scene ("underexposed", "overexposed", and normal). The three images are then combined into one which highlights the dark areas and adds dramatic contrast to lighter areas, such as clouds in the sky. A similiar process is used for HDR TVs. The upshot is that colors and contrast are significantly enhanced, particularly in dark scenes (and they're all dark in today's movies!)
There are two enhancements on HDR: HDR10+ and
Dolby Vision.
Standard HDR is "static": The levels of brightness are set for each movie, and are essentially determined by the brightest
scene. HDR10+ and Dolby Vision are dynamic. The brightness and contrast are enhanced on a scene by scene basis.
Both processes send video information ("metadata") along with the video in order to do this. This is the video
analogue to Dolby Atmos, which sends audio information along with audio (more on this under "Audio" below).
Dolby Vision is potentially more vivid than HDR10+, although current equipment is just beginning to support the extra
brightness and bit depth.
Also, Dolby vision is proprietary - manufacturers must pay a licence to Dolby to use it,
whereas HDR10+ is "open source." So TV manufacturers are divided on implementation of both formats,
but the bottom line is that either HDR10+ or Dolby Vision really make your movie experience gorgeous!
Frame Rate/Refresh Rate. A decent TV should be easily capable to displaying 120 frames per second.
HDCP 2.X: This is "High bandwidth Digital Copy Protection". HDCP 2.3 is the latest version of anti-copying protection, and it affects only 4k/UHD content. You should make sure that your new 4kTV, AV receiver, and Blu-ray player all support HDCP 2.3. This is not necessary for "High Definition" or"HDTV" content.
4k "Upconversion": 4k equipment can upconvert High Definition content (DVDs or streaming) to 4k. You will need a 4k TV to actually see the 4k output. However, if you buy a "4k upconverting" Blu-ray player, it will make the images on an existing HDTV look clearer - I have seen this on my older Samsung 60" TV before replacing the TV with a 4k unit.
Audio
The numbers (5.1, 7.1, 5.2.2, etc): I discuss this in great detail - with pictures - in a bit.
Dolby Digital 5.1 or DTS 5.1. These have been the standard for movie audio for a long time. You will see one of these on almost all DVDs or Blu_ray disks. The movie soundtrack has been split into 5 channels: Front Left, Center, Front Right, Side Surround Left and Side Surround Right. Also the bass is supplied as one additional channel, sometimes called "LFE", for "Low Frequency Effects".
"Dolby Digital EX" and "DTS-ES" came a bit later, and add a back channel, mainly to provide a better effect for people sitting in the back of movie theaters. This would be "6.1" This channel is not necessary for home theaters unless one's room is quite big.
Dolby Atmos adds "height" information, by way of 2 or 4 speakers placed on the walls or ceiling. Dolby Atmos also revolutionizes the way sound is handled. It sends sound information ("metadata") along with sounds. This sound information can direct sounds to specific speakers, not just general "channels" like "Front", "Center", and the like. The sound of a helicopter could, for instance, be directed to just the 2 or 4 height speakers.
Dolby Atmos is delivered through either of these two formats: Dolby
Digital Plus or Dolby TrueHD.
Dolby Digital Plus is a "compressed" format and is used by streaming services like Netflix.
Dolby TrueHD is a "lossless" high quality audio that currently is only available through Blu-Ray disks and newer
Blu-Ray players.
Note that the DTS equivalent of Dolby Atmos is "DTS:X" and the DTS equivalent high quality lossless audio is "DTS-HD Master Audio".
ARC and eARC.
This would be a good time to discuss ARC (Audio Return Channel) and eARC (enhanced Audio Return Channel).
When you connect the TV to the other equipment, you usually use the jack marked "HDMI (ARC)", as discussed in
the "Setting It All Up" section below. This is the "Audio Return Channel", and allows the TV's audio to be carried
back to the AV receiver or soundbar. This channel will be used when you use streaming content on the TV, whereas
the Blu-Ray player usually directly connects to the receiver or soundbar and passes its audio directly to the receiver
or soundbar. I mention ARC and eARC here because ARC only passes Dolby Digital Plus - the compressed audio.
eARC can pass Dolby TrueHD, but eARC is only now becoming available - my older 2019 Samsung QLED TV did not
have it. but the 2021 model does.
It is for this reason that I make the statement above that Dolby TrueHD is currently available for the most part on
newer Blu-Ray players that are directly connected to newer AV receivers or soundbars. If you do have a TV that supports
eARC, it is also necessary to use a "Version 2.1" rated HDMI cable (also mentioned below in the Setting It All Up section).
So: if you use your TV as the source for streaming services, and it supports eARC, and you have the 2.1 HDMI cable,
you might be able to receive Dolby TrueHD audio on streaming services, but it's still quite unclear whether any
of the streaming services actually send this Dolby TrueHD audio.
I might add, however, that that many people will likely not notice the difference between Dolby Digital Plus and Dolby TrueHD.
TV specs
LCD/LED TVs: These are the most prevalent sets nowadays. Each LCD/transistor unit does not create light by itself. Instead it opens up to admit light created by a second panel which contains arrays of LEDs. There are two kinds of backlighting:
Edge-light backlighting: The array of LEDS is placed on the borders of the set on the outer edges.
Full-array backlighting: The array of LEDs is distributed across the entire screen. This provides for more even lighting, expecially for larger screen sizes.
Local Dimming: This is a further enhancement. Discrete areas of LEDS can be dimmed, providing better contrast.
"Quantum" LED TVs: This process mixes very small electronic dots among the LCDs. Each of the dots is capable of emitting a color on their own. It's called "quantum" because the dots are small enough such that quantum effects begin to ocurr - although it does seem to be more a case of "Quantum Marketing" rather than Quantum Physics - since true Quantum effects are random and true Quantum particles are unimaginably small and last for infinitesmally tiny amounts of time. Nonetheless the result is magnificent color saturation and brightness.
OLED TVs: These contain "Organic LEDs". These can emit their own light without the need of LED backlighting. These are the really high end sets.
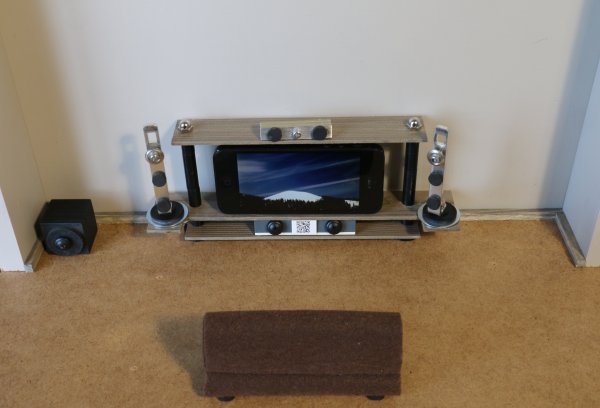
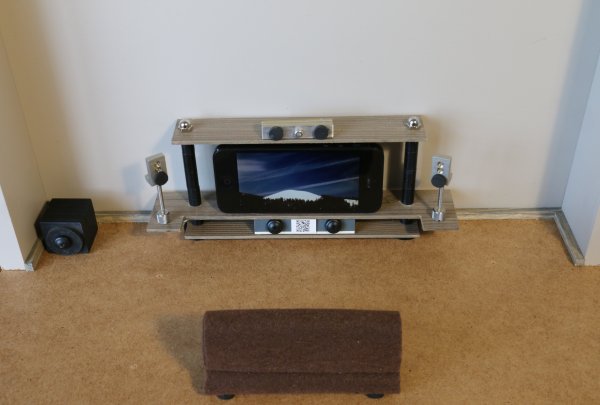
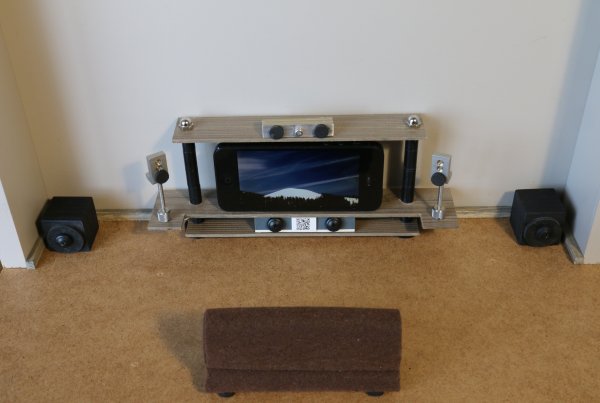
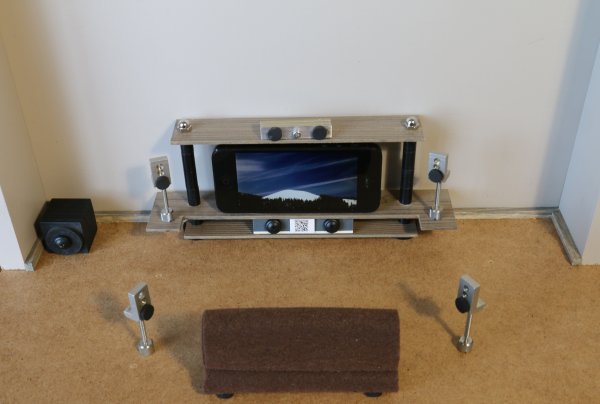
The NumbersThe audio channels of a Home Theater system are shown as: XX:YY:ZZ. "XX" is the number of front plus surround speakers. "YY" is the number of subwoofers. "ZZ" is the number of height, or Dolby Atmos, speakers. All of these systems serve the purpose of replacing the pitiful speakers that come with any TV, even the top of the line. There's simply no room in a thin flat screen TV to house any decent speakers. So here's a pictorial sample of the most common setups. (Soundbars are not discussed): NOTE: What you are looking at in the following images is "Jimmie's Home Theater Model". The "entertainment center" is scraps of thin wood. The "speakers" are various metal pieces; the "AV receiver" is a paper strip from a clothing label with two black screws for knobs and a QR code cutout for the screen; the subwoofers are blocks of wood painted black with a black washer on the front; and the "TV" is my old iPhone 5! The walls are painted fiberboard, and the floor is unpainted fiberboard. I even included natural wood "moulding"! Oh, and the "couch" is rolled up felt with rubber feet. | 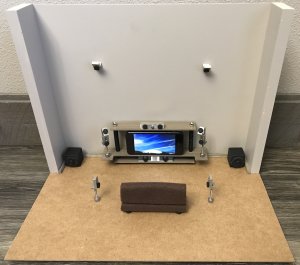 |
Here is the most simple home theater system. It consists of an AV receiver
and two floor standing speakers, each of which may contain 3 or more individual speaker drivers.
(I have placed the "floorstanding" speakers on the shelf at the same level as the TV). This system
is no slouch; some of these floorstanding speakers can get pretty pricey! This would be called a "2.0" system: A Front Left and a Front Right speaker. |
Here we have added a "center channel" speaker. This greatly improves
dialog. If you find you are constantly enabling "subtitles" to hear what the British accent (or
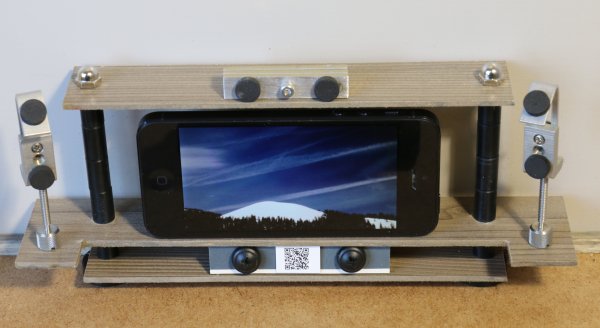
the mumbling) actors are saying, you need a center channel speaker! This would be called a "3.0" system. A Front Left and a Front Right speaker. A Center Channel speaker. |
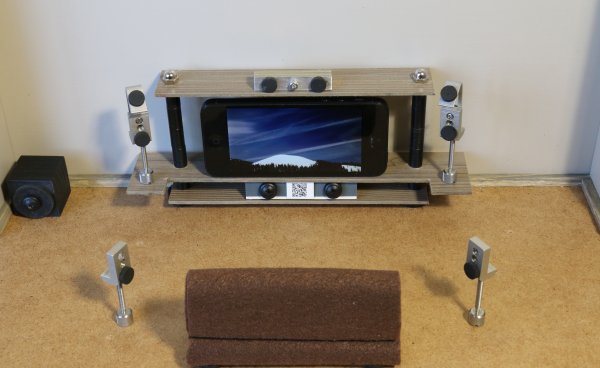
We add a subwoofer here. NOW we're talking about a decent home
theater system! Try to get at least a 10 inch subwoofer, but an 8 inch will be fine as well.
Most diagrams of home theater systems show the single subwoofer next to the front left speaker.
But Klipsch (one brand of speakers) recommends placing it in the corner. This is called "corner
loading" - The walls act as a "horn" to accentuate the bass. This would be called a "3.1" system. A Front Left and a Front Right speaker. A Center Channel speaker. A Subwoofer speaker. |
This arrangement is the same as the one on the left, except we
have used some "bookshelf" type speakers. These typically won't handle much bass, but
you won't need them to if you have a subwoofer. Thus they would be set as "small" (Explained
in the Setup section). This is also called a "3.1" system. A Front Left and a Front Right speaker. A Center Channel speaker. A Subwoofer speaker. |
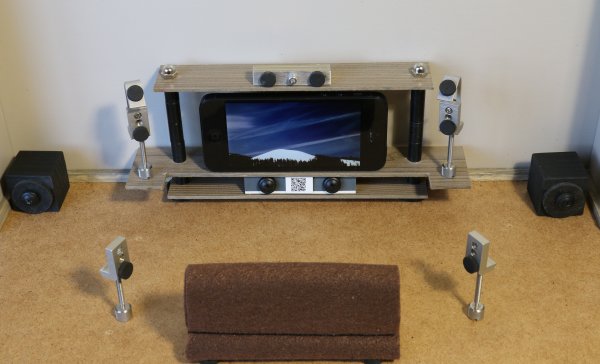
If you want a little extra OOOMPHA, add a second subwoofer. Klipsch suggests they be placed "assymetrically". So it might be better, say, to place one of the subwoofers next to the Left or Right speaker and pointed at an angle. Why? This helps prevent "standing waves" (areas of either reduced or excess bass) This would be called a "3.2" system. A Front Left and a Front Right speaker. A Center Channel speaker. Two Subwoofer speakers. |
And here is the famous "5.1" system! We have added a left
and a right "surround" speaker. This adds a whole new dimension to your home theater system.
If a vehicle drives off to the right, you will hear the sound on the right. If a storm is approaching
on the left, you will hear it first on the left. Movies will suddenly become a lot more realistic! This would be called a "5.1" system. A Front Left and a Front Right speaker. A Center Channel speaker. A Surround Left and a Surround Right speaker. A Subwoofer speaker. |
Here is the same system with an extra subwoofer. This would be called a "5.2" system. A Front Left and a Front Right speaker. A Center Channel speaker. A Surround Left and a Surround Right speaker. Two Subwoofer speakers. |
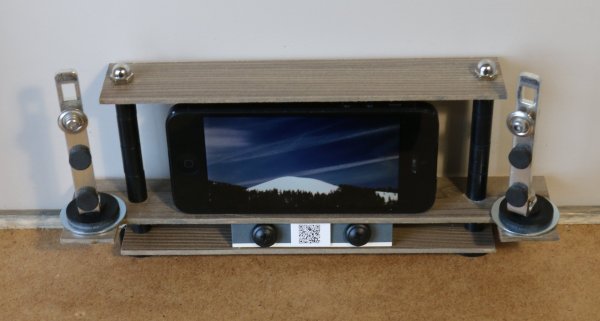
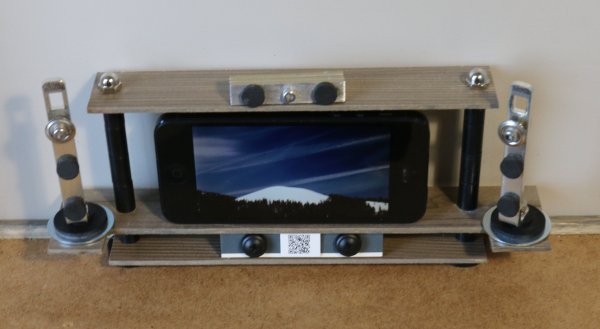
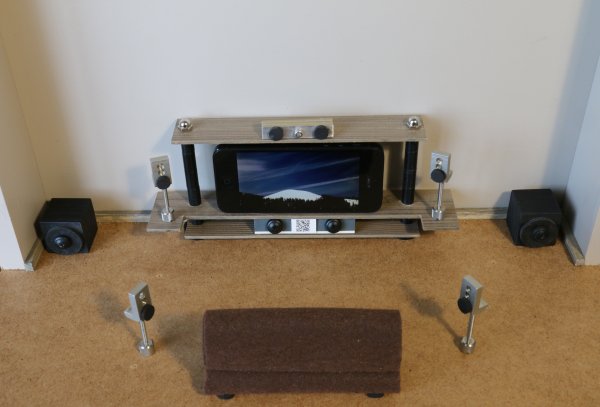
This is the first arrangement which includes "height" channels. This is called "Dolby Atmos" or "DTS:X". One way to get this extra sound is to use a pair of "Atmos-enabled" Front speakers. "Atmos-enabled" means simply that there is an extra speaker assembly on the top of the main speakers, pointed up so that the sound will bounce off the ceiling. This image is zoomed in to show more detail of the speakers. But the two surround speakers are still there in this setup. You would typically not use "height" speakers unless your system already has surround speakers, because the most Bang for the Audio Buck is obtained by surround speakers. Height units add a definite extra effect, but it is less pronounced than the effect obtained by adding surround speakers. |
Here we have the arrangement with the "Atmos-enabled" speakers and the surround units, and a subwoofer. This would be called a "5.1.2" system. A Front Left and a Front Right speaker. A Center Channel speaker. A Surround Left and a Surround Right speaker. A Height/Atmos Left and a height/Atmos Right speaker. A Subwoofer speaker. |
And here it is with the extra subwoofer. This would be called a "5.2.2" system. A Front Left and a Front Right speaker. A Center Channel speaker. A Surround Left and a Surround Right speaker. A Height/Atmos Left and a height/Atmos Right speaker. Two Subwoofer speakers. |
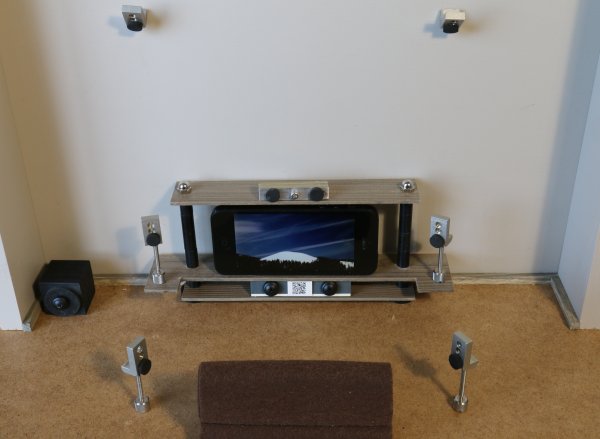
If you want to spend a little extra time, you can place separate
"height" speakers on the wall above the Main speakers. This will result in better sound than
having height speakers built in to the Mains and reflecting off the ceiling. This would be called a "5.1.2" system. A Front Left and a Front Right speaker. A Center Channel speaker. A Surround Left and a Surround Right speaker. A Height/Atmos Left and a height/Atmos Right speaker. A Subwoofer speaker. |
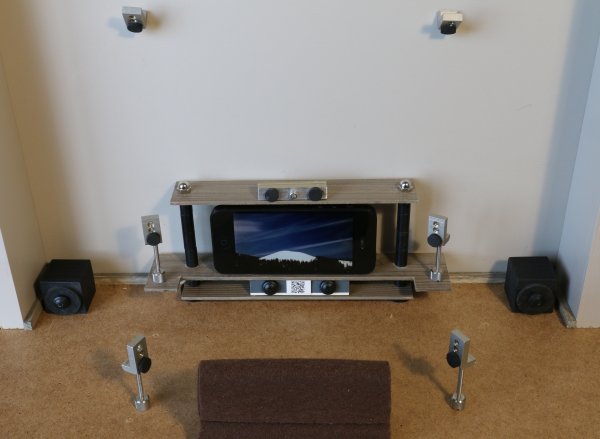
And here is the same system with the extra subwoofer. This is what I have for my own home theater system (picture below). This would be called a "5.2.2" system. A Front Left and a Front Right speaker. A Center Channel speaker. A Surround Left and a Surround Right speaker. A Height/Atmos Left and a height/Atmos Right speaker. Two Subwoofer speakers. |
My Own Home Theater Systems
|
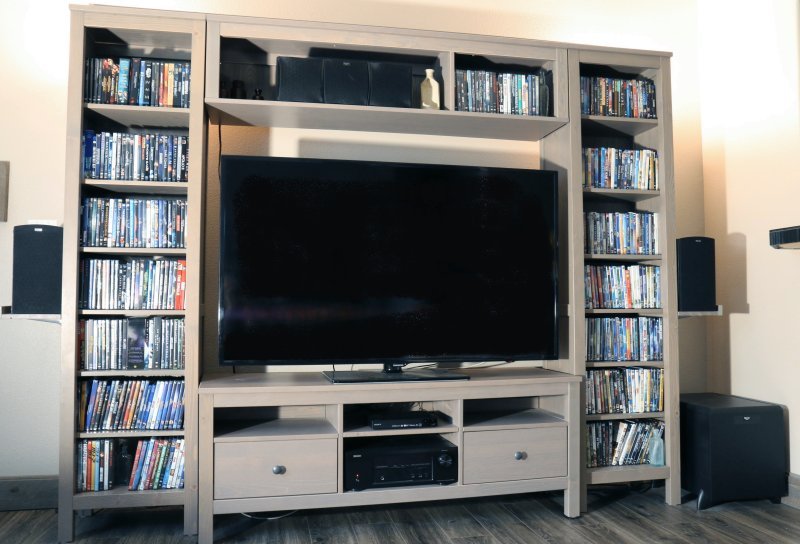
1 Shown here is my former TV system.
It consisted of a 60 in Samsung TV (2013 model), a Denon E300 receiver (2014 model), Klipsch
Icon VC25 center channel speaker, Klipsch Icon KB15 Front speakers, a Klipsch SW450 10 inch
subwoofer, and a Sony BDS6700 Blu-ray player. So it would have been a "3.1" system. It has been
a fine arrangement. The Left and Right speakers are in line with the TV. That can cause some sound issues due to the sound waves bouncing off the TV screen. The Left and Right speakers are not angled toward the listening area (they are pointing straight ahead). Speakers are directional for mid and high frequencies. They will sound clearer if pointed toward the listener. The Center Channel speaker is not in the center. Also it's not angled downward. Before I replaced this system, I corrected these problems. The result? The system was significantly improved. If you find you are constantly turning on subtitles, consider making these changes to your speakers! I will discuss the correct way to position speakers in the next section. |
 |
2 Here's the system after a few changes. It consisted of: The same Klipsch "Icon" series Front and Center speakers. The same Klipsch sw450 10 inch subwoofer. A second subwoofer - a Klipsch R-100 SW 10 inch. Klipsch R-41M bookshelf speakers - 2 for surround (not visible in this shot), 2 more for height) A Samsung QN65Q80 65 inch "Qled" TV A Denon AVR740 receiver (2019 model) A Sony UBP-X800M2 4k Upconverting Blu-ray player The (important) changes: The shelves for the Front Left and the Front Right speakers have been modified to protrude out about 8 inches from the front of the TV. Also these speakers are turned inward to face the center of the listening area ("toed in"). The Center Channel speaker has been tilted downward to directly face the main listening area, (by stacking two 1/2 inch thick rubber mounts underneath the back side). The two Height speakers are the same brand and model as the two surround speakers (Klipsch R-41M). This help to equalize the output of height and surround channels. Also it saves the extra expense of purchasing "official Atmos-enabled" units for the height channel. I simply made two shelves tilted downward. The setup still has a serious, show-stopping issue. And yes,
it will stop the show! And what is that? |
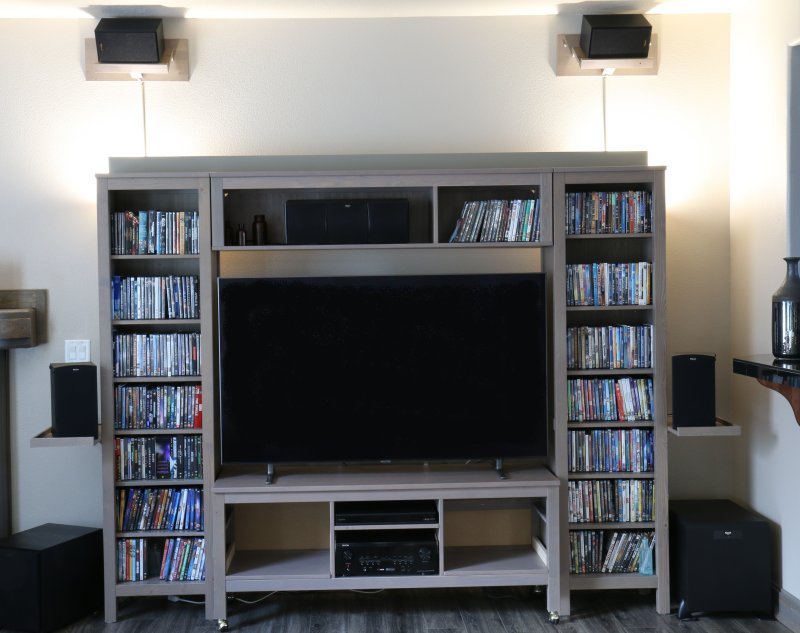 |
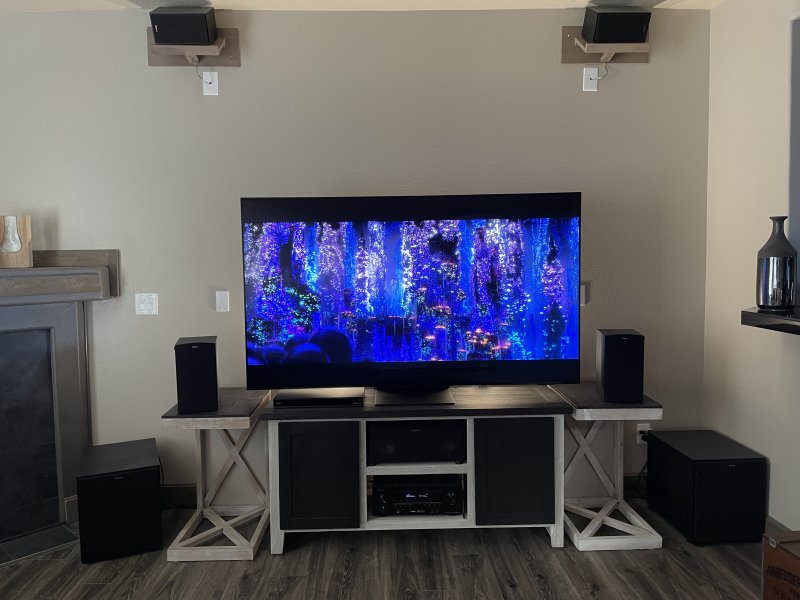
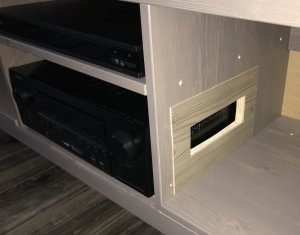
3 Well, here's "Version 3.0" of my Home Theater System. (I got rid of the two distracting DVD bookcases.) My system now consists of: A new Klipsch RP-250 Center Channel Speaker. It's on the second shelf of the TV stand. Two new Klipsch R-120SW 12 inch subwoofers!! A 2022 Samsung 75 inch QN75QN90 TV! (That's the Dragon cave scene from How to Train Your Dragon III - 4k Blu-ray.) The same Klipsch "Icon" KB15 Front Left and Right speakers. The same 4 Klipsch R-41M bookshelf speakers - 2 for surround and 2 more for height) UPDATE, 2/2024 I bought a Denon x1800H Home theater amp (on lower shelf of the TV stand).
I did this because the former Denon S740 receiver only supported "ARC" rather than "eARC" - the Samsung TV
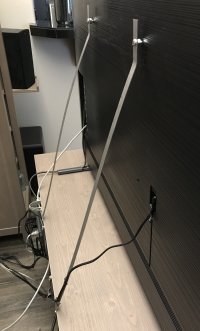
supports eARC. Placing the lights behind the TV seems to provide more pleasant viewing conditions. Note also that I managed to hide the speaker wires for the height speakers behind the wall. This is easy for interior walls. You simply cut a hole right below the speakers and pass the wire down the wall and come out under the moulding. This is much more difficult for exterior walls, because the insulation makes it difficult to push the wires down the wall. I did it by passing a plastic cable channel behind the wall and then pushing the speaker wire through it. The channel would only reach about half way down, so I cut a small hole in the middle of the wall and then put a cover plate over the hole. You can see these plates on either side of the TV. |
 |
Setting It All Up
General
BIG TIME TIP: The bane of all electronic gear - computers, home theater systems, whatever,
is that all the connections are in the back of the equipment! So consider putting your cabinet/stand on
sliding casters - either smooth ones for a carpeted room or the carpeted one for hardwood/laminate
floors.
If you have hard floors, consider rolling casters! You can see them in picture
2 above, of my second home theater arrangement. The initial setup
won't be the last time you have to get to the backside of the cabinet or stand. Why not? Because
you might add some more gear. Even more likely is the possibility you will want to UPGRADE.
You know you will. . .
 |
Make sure your AV receiver is not in a completely
enclosed space. These units run hot! "OOOMPAH" takes a lot of audio energy! So if possible, place
the unit in a fairly open area, and preferably with the cabinet back removed. There should be at
least 1 inch between the chassis and each side - preferably 2 or more. |
 |
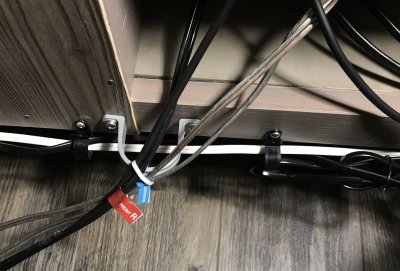
Make your cableing look nice. As a former electronic tech,
I learned that if things look neat, they are much more likely to work properly! The large grey electrical clamps are handy when one or more A/C cords pass next to other wireing. As shown in the picture on the right, a couple of power cords pass along the bottom of the cabinet (the black and white wires secured by two small black cable clamps.) Passing over them are some speaker wires and a subwoofer line which are tied to one of the big grey clamps. This holds them away from the power cords. |
 |
 |
Safety (for you and your big screen TV): |
Speaker Placement and Connections
The "Mains":
The Front Left and Right speakers should stick out from the front of the TV and
should be angled inward - facing the listening area. They should be the same distance from the TV.
The Center speaker should be tilted downward (if its on top of the TV) or upward (if it's below the TV) so that
it is directed toward the viewer.
All three speakers should form an arc rather than be even with each other. The distance
of the three speakers from the listening area should be the same, if possible.
The wire length for all three three speakers should be approximately the same.
If possible, the wire length of the two surround speakers should also be approximately the same length.
Same for the two height speakers, if possible.
The subwoofer(s):
If you have one subwoofer, you will get more "OOOOMPHA" if you place it in the corner, as discussed
above.
If you have two subwoofers, place them asymetrically in front of the room. (For example,
have one face the listening position and the other face straight forward). Klipsch suggests that placing
subwoofers in the corner accentuates the bass. Some other articles will tell you not to place them
in the corner.
It's your call.
General speaker wiring:
Use 16 or 14 guage stranded wire for all speaker connections. (14 guage is bigger, but
16 guage should be fine. You can buy a roll of 100 foot speaker wire at one of the big box home
improvement centers. Stranded "non-speaker" wire will do fine. It's a bit harder to tell which conductor is which,
because this wire has one conductor ribbed and the other plain. Personally, I feel that it is not necessary
to buy the exotic uranium-coated, quantum-tuned, anti-vaporlock stuff for 100 bucks a roll!
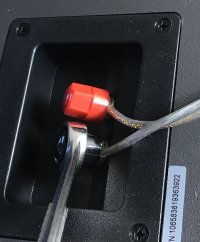 |
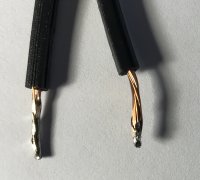
Make sure you connect the "plus" side of the amp to the "plus" side of each speaker.
Thus you might connect the copper-colored strand of speaker wire (or the ribbed side of regular wire)
to the red terminals of the amp and the speaker. If you don't, the sound could be reduced because the
speakers will be "out of phase" (sound waves from one side cancelling those from the other side). Make sure you don't have any stray wire sticking out and possibly contacting the
receiver chassis. When I first hooked up my system, the Denon overheated and shut down. This
was due to one tiny piece of conductor laying against the chassis! If you have a soldering gun, you can
"tin" the tip of the wire - just the tip, not the entire exposed wire. (The binding posts on the receiver and the
speakers will be tighter if they are against the bare copper conductors). |
 |
"De-couple" your speakers from their stands/shelves/floor. This keeps them from transmitting sound to their supporting surfaces. So for example, use the rubber feets that most speaker manufacturers provide. Try to find some sort of soft support it they don't. There are many types of stick-on pads available - felt, rubber, and the like. For the subwoofers, if you have hard floors, place them in caster cups that have carpet on the bottom - even if the speakers have rubber feets.
Connecting Everything Else
HDMI connections:
Decide what is the "hub" of the system. If you have an AV receiver or a sound bar, that's the hub.
NOTE: I am using the Samsung TV as the "Smart" device, rather than the Denon AV. Nonetheless the Denon
AV is the "hub" - you connect everything to it.
Connect the "HDMI/ARC" or "HDMI/eARC" output (might be labeled "Monitor") on the AV receiver to the "HDMI/ARC/eARC"
jack on the TV. "ARC" is "Audio Return Channel". "eArc" is "Enhanced Audio Return Channel. This feature
allows you to connect the TV to the receive with only one cable; it handles both audio and video..
Connect the Blu-Ray player to the hub. The Denon has an HDMI input marked "Blu-Ray".
Otherwise select any HDMI input on the receiver or soundbar.
If you have other equipment, plug devices like Amazon Firestick or Google Chromecast to other HDMI inputs
of the receiver/soundbar.
Quick summary: If all you have is a Blu-Ray player, you have only two HDMI cables. One from the Blu-Ray to the AV receiver, and one from the AV receiver to the TV.
A note on HDMI cables: HDMI has "versions". So it is well to
get "2.1" (48 GHz). 2.1 supports speeds of 48 GHz, and will provide much better audio, support upcoming HDR improvements,
and also support the "enhanced" Audio Return Channel. |

|
Other connections:
If the AV receiver or soundbar does not have "ARC" or "eARC", then connect an "Optical Digital Audio" cable from
the "Digital Audio out" of the TV to the "Digital Audio in" of the receiver/soundbar.
Internet: Just about everything has a wireless connectivity built-in. The Blu-ray player, the AV unit, and the
"Smart" TV. But if you can run a direct ethernet wire, it's MUCH faster! I used wireless for my former system.
When I selected Netflix, there was about a minute delay before it came up. With a direct connection, as
soon as I click "Netflix", immediately the "Who's watching" screen is available.
Are You Ready For the Big Moment - Power ON?
G'wan. Mash all those power buttons. You know you want to.
But before you do:
Recheck all the speaker wire connections in the back of the AV unit. Look closely
for bare wires sticking out. I had one even despite "tinning" all the wires. It was touching the AV chassis
and caused it to shut down (although I hadn't cut out any ventilation openings yet - so that may have
been the cause).
Recheck the backs of all the speakers. Make sure all the terminal knobs are tight.
Take another peek at the HDMI connections.
Did you put new alkaline batteries in all the remotes? Preferably Duracells
or Energizers as opposed to the assorted, possibly questionable brands that come with the equipment.
Powering On (Some Tips)
In this section I will discuss main points. The details will differ depending on
the brands of equipment you have selected. However, in my experience, I would have to say:
Everything you have done up to now has been the easy part. It goes downhill from here!
Why? Because most of this stuff is "smart". There's lots of software making decisions that you may
or may not like.
One MAJOR HEADACHE is the default "always ON" condition for Samsung "TV Plus"!!
Taming it is discussed under "The Smart TV" right below.
Another is the set of software called HDMI-CEC.
HDMI-CEC
This is HDMI "Consumer Electronics Control". It was introduced in 2005. The stated goal
is that you can use one device, perhaps the TV, to control all the other equipment. Well, that's the
plan, but in actual fact, HDMI-CEC has not been standardized. The result is that each manufacturer
has implemented it in unique ways. They have even named it differently: Samsung is "Anynet+", Sony is
"BRAVIA Link", Sharp is "Aquos Link". LG is "SimLink".
I have looked at countless articles on getting all this to work. Even Klipsch, the speaker anufacturer,
has an article on "How to troubleshoot a faulty HDMI Connection". They all use terms like "Try this. . ."
"If that does not work, try this. . ." Or, "Use a process of elimination." And they all, almost without exception,
use this phrase: "If nothing else works, try resetting all the settings to the factory default."
So, I had great plans of ending this article with a nice, organized list of what to
do to get all this gear running properly. But my experience turned into the typical session that we helpless
humans have when confronted with intelligent electronic machines. After a few days of trying countless things
and countless sequences, I have managed to get my system (mostly) where I want it to be.
Translation: I meekly took what the software gave me!
I have turned "HDMI control" to ON for both the TV and the Denon. Note that is necessary to have
HDMI Control to ON for the TV to allow HDMI ARC/eARC to work. But I have turned HDMI Control OFF for the
Blu-Ray player.
So, here's my current "mode of operation":
I turn on the Denon AV receiver. I actually just stroll over to the unit and use its front panel power button. This way I don't need to keep its remote handy.
I then turn on the Samsung TV, with its remote.
When finished watching streaming movies, I turn off the Samsung TV with its remote.
The TV then automatically turns off the Denon. Further, I can control the volume of the Denon using the Samsung
remote.
I have not found a way to get the Denon to come on when I turn the TV on. The Denon documentation seems
to back this up. It specifically states that when you set its HDMI Control to ON, "When you turn the TV’s power to
standby, check that the power of this unit also goes to standby." It says nothing about what happens when
you turn the TV's power from standby to "on".
If I want to play a Blu-Ray, I manually turn the Blu-Ray player on. Why don't I have HDMI Control ON for the Blu-Ray? Because it gets turned on automatically when I turn on the TV.
The "Smart TV":
Set "Picture Mode" to "Movie". Some sets come from the factory with the colors maxxed out so
they will dazzle in the showroom. So this is the first step - almost every article on home theaters
recommends this. (And it did result in excellent video.)
All of this having been said, the "Dynamic" mode on Samsung TVs yields the most dramatic picture!
Set up the wireless or hard-wired internet. I would say that modern gear can do this automatically
(I won't think about how the machines didn't seem to need my network password!)
Most sets will allow you to display only your desired "apps" (Netflix, Prime, etc) on the "home" screen.
If you use HDMI ARC/eARC, it is necessary to enable HDMI-CEC.
Taming the Samsung "TV Plus".
Recently I upgraded from a 2019 Samsung QN80 65 inch TV to a 2021 Samsung QN90 75 inch TV. The
connections were essentially identical, so I had it working in 5 minutes.
Then I spent the next 4 hours trying to stop the automatic playing of TV content ALL the time when
the "Home" screen is displayed!!.
So here's how to stop it:
Press the Home button on the remote control.
Select the "TV Plus" app on the Home screen.
Select "Channel List".
Select "Edit" Channels. There is an option to Select All.
Select "Delete".
At this point the "TV Plus" icon will disappear from the apps list on the Home screen. (It goes to
the "Source" list). But the TV is still playing other optional content (apparently "Live TV")!
So it's still not stopped! The TV content is playing (above the Home Screen icons) as soon as
you turn the set on.
To stop the TV from playing if you are using an A/V receiver:
Using the A/V receiver's remote, set the A/V receiver to something other than "TV"! For example, set it to
"Blu-ray". The annoying TV will STOP.
Explanation: When you are setting up your TV for the first time, plug in the HDMI cable of the A/V
receiver. Usually you connect the cable to "HDMI/eARC" (might be "HDMI/ARC" on older models). This is
"Audio Return Channel". When you turn on the TV, it recognizes the A/V receiver, but automatically sets
the A/V receiver to "TV"! So set the A/V receiver to some other source. I used "Blu-ray". I actually have a Blu-ray
player, but I don't turn on the Blu-ray player until I want to watch a DVD. When I watch streaming TV (Netflix, etc)
I simply leave the Blu-ray player off. No more playing TV channels when I turn on the TV!
Will this work if you don't have a Blu-ray player? Not sure, but setting the source for the A/V receiver to anything
other than "TV" should stop it.
If you are NOT using an A/V receiver, it appears that if you have anything connected to the TV, you can
select that as the source on the TV's "Source" menu, and the playing of TV content will stop. I confirmed this
by contacting Samsung (by chat).
The online chat conversation was interesting.
They did confirm that selecting something else on the TV's "Source" menu will stop the playing of TV content.
I then asked what happens if the user has nothing connected to the TV (they're just using it for streaming).
The response: "If the TV is not connected with the any external source, it will only show TV". The agent said
further "On the latest TV it's a default option, we don't have to close this option."
I then asked "So it appears you are saying that streaming users have no choice but to watch TV content at all times,
even when just switching to various providers - Netflix, Prime, etc".
The reply: "After switching to Netflix and Prime it will not appear, it's will only appear after turning on the TV and
while switching between the streaming services."
I take all of this to mean Samsung has no intention of changing this behavior!
Helpful extra step:
From the Home screen, select "Smart Hub".
Select "Settings". . ."General".
Select "Smart Features"
Deselect "Autorun Last App".
What will NOT work:
Many sites suggest selecting the "Samsung TV Plus" icon on the Home screen (assuming that you have not
yet deleted all the TV Plus channels.)
Then you are to select the "Down" position on the "Navigation Ring" on the remote.
Then you are supposed to be given the option to "Move" or "Remove" the TV Plus app.
But this option was present on my 2019 Samsung TV. It is NOT present on the 2021 model. Pressing
the "Down" position only results in a display of available free movies.
The AV Receiver:
If you are using the TV as the internet-connected device, make sure the AV receiver didn't automatically
connect to wireless.
Set up "Speaker Configuration". This is where you set the speakers to "Large" or "Small". These
terms mean essentially just that. More correctly, you set a speaker to "Large" if it can handle
bass - low frequencies, and "Small" if it handles mainly mid-range to high frequencies. Typically
a "large" floor-standing speaker can handle bass but a "small" bookshelf speaker can't. If you
don't have a subwoofer, you would probably want to set the Front L and R and the Center
speakers to "Large", even if they are physically small. But if you do have a subwoofer, setting
the Front L and R and Center speakers to "small" helps the AV unit run cooler - the majority
of audio power is spent on the lower frequencies; you are literally pumping air!
Set up "Subwoofer Mode". This is somewhat confusing. Usually you can select either "LFE" or
"LFE + Main". ("LFE" means "Low Frequency Effects".)
"LFE": The low frequency signals that would have went to all channels set to "small" are directed instead to the subwoofer.
"LFE + Main": The low frequency signals of all channels are directed to the subwoofer. In this case, if you have set the "Mains" to "Large", you'll hear bass from both the Main speakers and the subwoofer.
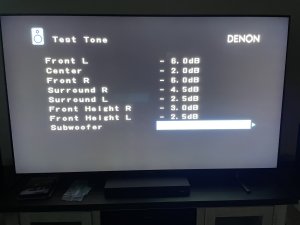
At this time, you can "tune" your system, however I recommend that you wait on this step until you have watched a few movies and positioned your speakers like you want them. I for instance tried the two surround speakers just behind the listening area. But I found that the side effects were better when these speakers were placed slightly forward of the listening area. It is well to get your speakers in positions that sound good to you prior to tuning. Why? Because if speakers are moved after you have tuned the system, you'll have to re-run the tuning program.
Tuning your Sound system: Listen to a selected section of a movie that exercises surround/height capability first. This way you can listen to the same section after you have done the tuning, to see if you like it. I might suggest the scene early in Captain Marvel where the Skrull are probing the memory of Carol Danvers. The voices of the Skrull appear to come from up/around her, as if you were in her head. Turn your subwoofer(s) to "On" rather than "Auto", if they have this feature. "Auto" means the subwoofer turns on when it detects bass. Since this involves some delay, the speaker won't calibrate properly. Also set their volume to the "center", usually with the pointer sticking straight up, possibly marked "0dB". Set the microphone in the center of the listening area at ear level. If it's just you and your spouse, set the mic between the two places you normally sit. (Screw the kids!) Run the sequence of tones. Move the mic to the left, no more than 2 feet. Run the tones again. Now move the mic to the right of center, the same distance from the center as your left position. Run the tones again. The Denon recommends 6 sequences. I suggest stopping at 3. This makes the adjustment more concentrated for the listening area, in my opinion. Save the settings. The unit will now adjust its output accordingly. You can view the results - the system will show you how many feet each speaker is from the listening area, and show how it adjusted the volume of each spealer. For Denon (and perhaps other) receivers: After the Audyssey tuning is finishes, the Denon will display a choice for what it calls "Dynamic EQ". The default is "On". You might leave it on. This causes the bass to be enhanced at lower listening volumes, which does help quite a bit. This used to be called "Bass Boost" on older Stereo units. Now listen to the same movie section. I found it to be noticably better!. NOTE: if you still have a little trouble with dialog, see "Optimizing the Center Speaker" right below. Reset your subwoofer(s) to "Auto" so they won't be on all the time. If the bass is a bit loud after the tuning, you can turn down their volume a bit. Most subwoofers have independent volume control. I usually run mine a little below the center position. | 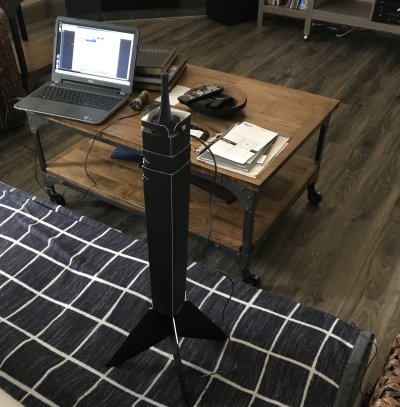 |
|
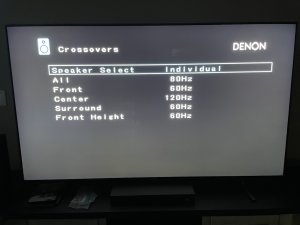
For bigger TVs, it might be better to have the Center Speaker below rather than above the TV. It's closer to your hearing level that way. Also, tilt it up a bit, so that the speaker is aimed right toward your ears. Raise the volume on the center speaker a bit. I went from -5.0 dB to -2.0 dB, as shown in the left image. You can experiment with slightly higher volumes, such as -1.0 dB or even 0 dB. Filter out more of the lower frequencies. Lower frequencies cause a speaker cone to move forward and backward more. If voices and dialog come through this moving cone, the voices are propagating off a moving surface, and will sound slightly wobbly. So we raise the cutoff of the lower freqencies a bit. So, as shown in the right image, the cutoff was changed from 80 to 120 Hz. NOTE: Make sure the Center Speaker is set to "Small". (SEE "The AV Receiver" above.) |
||
 |
As shown here, we went from -5dB to -2dB. And here, we went from 80 Hz to 120 Hz. We want to use the Center Speaker to handle mid-range and high frequencies, not the lower ones. |
 |
The Blu-ray Player:
As with the AV receiver, the Blu-ray player may attempt to connect to wireless. If you are
using the TV as the connected device, then you will want to disable the Blu-ray wireless connection.
NOTE: Sony makes excellent Blu-ray players. I own several of them. However they do
not come with Disney Plus, althouch this should not matter if you are using the TV as
the "Smart Device" (that is, the device where you select the desired streaming service to watch).
If you bought a 4k Blu-ray player and a 4k TV, both devices may be capable of "upscaling"
non-4k content to 4k. If you "know" your TV is upscaling, and the picture does not look
as good as you might expect on non-4k content, try turning off the upscaling on the Blu-Ray
player.
Getting Some Interesting Content to Watch
Netflix and other streaming services offer "4k" versions of many
of their movies. But you will see them in 4k only if your internet connection is fast enough.
It is necessary to have 25 megabit/second or more to stream 4k. You can run some sort
of "Speed Test" on your internet to find out. If you are using wireless to connect to your
home theater, then be sure to run the speed test on a device (preferably a laptop or
tablet) that is in the same room as the system.
DVDs: Although many articles claim that "DVDs are going away, and streaming is the only
way to get content nowadays", nonetheless there are plenty of other articles which
point out that the best quality audio/video is obtainable only with a 4k Blu-ray player.
The author of "Practical Home Theater" concurs as well.
I have a fairly extensive DVD collection, but most of mine are "standard" DVDs, not
Blu-rays. I really did not notice a significant difference on my older 1080p "high definition"
TV.
But there is a significant difference on a newer home theater system. Older High Def Blu-rays
produce a much clear picture on a 4k TV than High Def "standard" DVDs. The sound is
better also, and you are more likely to get a true "Surround sound + height" experience
from a Blu-ray DVD. Most standard DVDs show "Dolby Digital" or "Dolby Audio" on the
back, but many Blu-ray versions of the same movie show "Dolby Digital" and "Dolby Atmos".
Here's some selected excerpts to watch: Amazon links are provided in case you want
to purchase the DVDs.

|
Captain Marvel, scene #3: The Krull have captured
Carol Danvers and are probing her memory. Their voices appear to come out above and also on the sides,
as if you were inside Danvers' head, listening to the voices. This is an especially good demo of surround
and height effects! How to Train Your Dragon 2, scene #12 and scene #15. Scene 12 is the one
where hicccup first enters his mom's dragon cave. The scenes here are intricate and are simply gorgeous
in 4k. Scene #15, where Hiccup is flying with his mom, is also a visual treat. |

|

|
How to Train Your Dragon 3. The sequence where
Hiccup and Astrid fly into the Hidden Kingdom is an utterly mesmerizing visual and musical treat. Twister. The whole movie is a showcase of surround and height effects.
And it will dust off your subwoofers too. We watched this movie recently during one of the Pacific coast
storms, and found ourselves pausing the movie more than once - just to make sure the whooshing
was coming from our speakers and not outside! |

|
|
|
Avatar. If you like dreamlike sequences of gorgeous
scenery and imaginary creatures, there are some long sequences of Jack and his new-found Navi lady friend
walking through the phosphlorescent nighttime forest. Your surround system will get a thorough workout
as well during many of the action scenes.
2012. This movie, like Twister, is a movie-long showcase of surround sound and height effects. It's not just during the more active scenes like the incredible blast at Yellowstone. Sometimes, when the actors are inside the RV or in the big ships, you find you are surrounded by creaking and groaning noises as the vessels are being knocked about. |

|

|
The Croods. This movie is full
of beautiful graphics and sequences. It also has lots of surround sound effects as well.
For some reason, the standard DVD looks just like a Blu-Ray in quality.
|

|
Helpful Links for Ordering Selected Speakers.
Want to order some of the speakers described above? Here are some links. Ordering items using these links helps support the Wracklineblog.
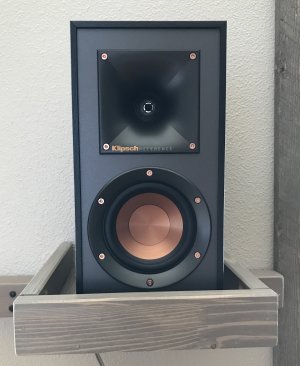 |
At the left is the Klipsch R-41M. It is shown with the cover removed.
This unit makes a great surround or height speaker. I have used it for both in my setup - see the Home Theater
Systems pictures 2 and 3 above,
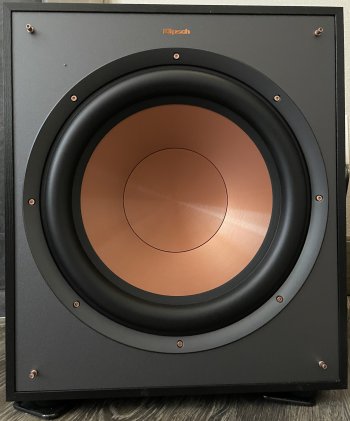
which show the two height speakers. Having the surround and height speakers match is not a bad idea, as well. And the subwoofer on the right is the Klipsch R-100SW 10 inch woofer (with cover removed).
You can see it on the left side of Systems 2 above. (The right side shows the
older "SW450" 10 inch subwoofer.) 
|
 |
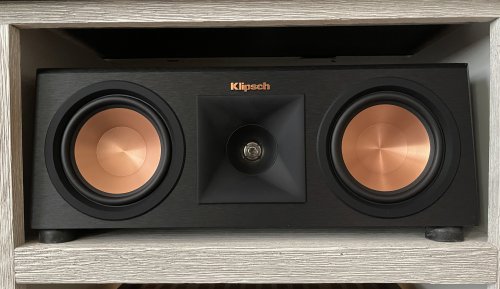 |
At the left is the Klipsch RP-250 ("Reference Premiere") Center Channel speaker (with
cover removed). It has a "Tractrix horn tweeter", and two 5.25 in woofers. It's shown in Systems
3 above. |
 |
 |
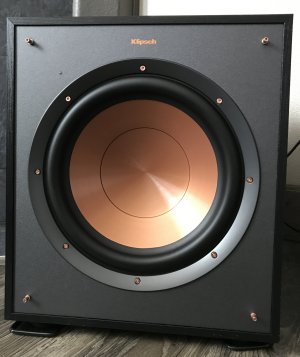
And the beast on the right is the Klipsch R-120SW 12 inch woofer (with cover removed). There's a pair of 'em in Systems 3 above. When the R-120SW speaks, it reminds me of Krishna's words in the Bhagavad Gita: "I have spoken with authority!" |
 |
Copyright © 2022 J.A.