Are you tired of drawers that open part of the way and then Bang! They abruptly stop, leaving
the last 6-8 inches in the back inaccessible? "Why can't I get the full use of all my drawers?" you ask yourself.
"Is there a sensible reason for that?" And on top of that, they're noisy in operation.
And the same applies to the typical shelf pull-out.
And yes, there is a reason for the reduced functionality of your cabinetry and dresser drawers. It's cost saving!
It simply costs less for home builders to use the cheaper two-section drawer slides. And the same applies to
less expensive desks and bedroom chests - and even some "high end" items. Further, the cheaper
two-piece drawer slides do not have ball bearings - they have noisy nylon wheels.
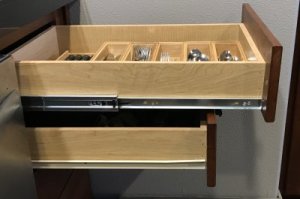
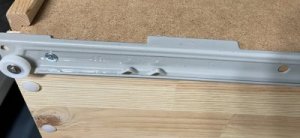
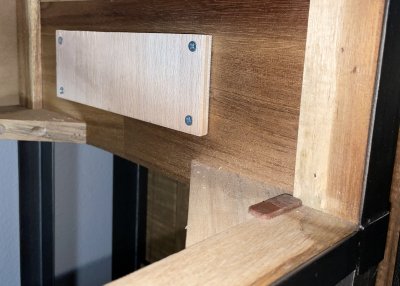
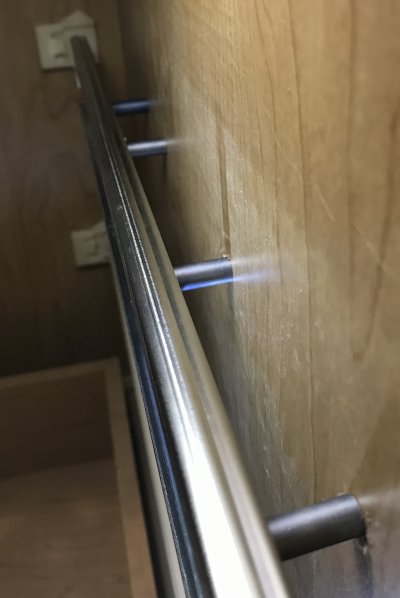
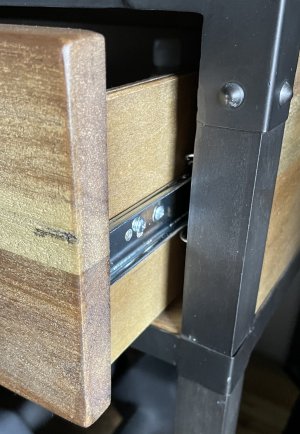
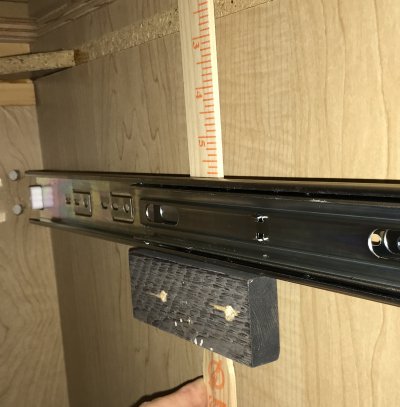
Note the two pictures on the right. On the top image, the top drawer has been fitted with
"Full Extension Drawer Slides". NOW the full interior of the drawer is accessible, like it should be. And in
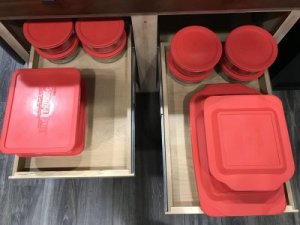
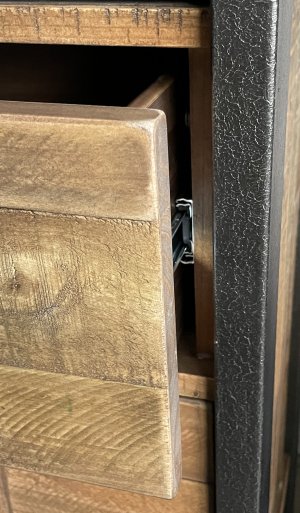
the image on the bottom, we show two pull-outs. The one on the right side has a full extension slide, while
the bottom one has the standard issue partial extension slide. Note the difference in pull-out convenience.
This is a significant upgrade your kitchen and bathroom cabinets!
You can now get to the back of all your drawers and pull-outs.
You get an upscale whisper-quiet operation for the drawers and pull-outs.
It's like all your drawers have been enlarged.
Warning! You will now want to do this to your bedroom chests, nightstands, and the like.
Nonetheless, before we begin, we should talk. . .
It ain't easy!
On a D.I.Y. scale of 1 - 10, the project can range from about 6 for most kitchen and bathroom cabinets,
all the way up to a solid 11 for furniture that has no slides to begin with!
Hopefully some of the tips and information that I show here will keep the project closer to that 6.
|
 |
 |
Preparation: How to Select the drawer slide. Other materials needed. Tools
needed.
 |
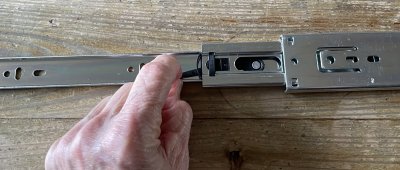
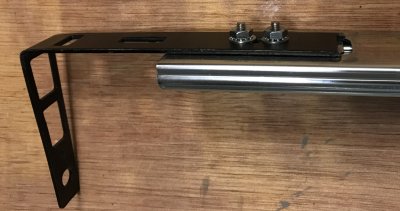
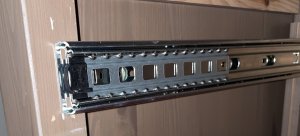
The drawer slides:
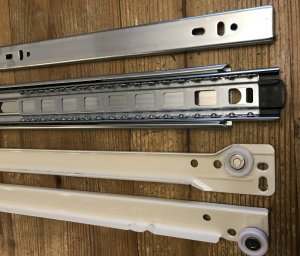
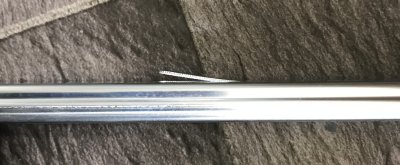
Note the difference between the 3-section Full Extension Ball-bearing Drawer Slide on the top and the
typical 2-section slide on the bottom. These are often called "Euro Drawer Slides".
Full extension drawer slides typically come in 12, 14, 16, 18, 20, and 22 inch lengths. Other sizes like
10 and 24 inch might be a bit harder to get. Just measure the depth of the drawer, from the back edge to the
back side of the drawer front. In other words, you want the length from the back to the front of the drawer, minus
the thickness of the drawer front. Round to the nearest available size.
For example, if you have a 19 inch drawer, you could probably use a 20 inch drawer slide, IF it will
fit inside the cabinet or piece of furniture. Otherwise you will need to use an 18 inch slide. |
Other items:
The drawer slides come with screws, about 1/2 inch long. But check the sides of the drawers
you are going to use. Some drawers actually have sides thinner than 1/2 inch, in which case you will need a
package of #6 x 1/4 screws. #6 x 3/8 would be better, but usually not available in common stores. The screws can
be "flat head" or "pan head" - as long as the pan head itself is not too thick.
As described below, you might need backside mounting brackets for the drawer slides.
In some cases it might be easier to use them rather than pieces of wood or spacers, also described below.
NOTE: If you are replacing slides on shelf pull-outs, or are replacing drawer slides in the bathroom
next to the lavatory, there may not be vertical surfaces to mount the slides. A backside bracket will be necessary in these
cases.
Tools:
Drill and bits. (Many cabinet and furniture frames are hardwood, and drilling pilot holes helps
greatly.)
A 90 degree square
Phillips screwdrivers. #1 and #2 sizes
NOTE: It needs to be a high quality Phillips, preferably almost new. Turning these tiny screws
will be next to impossible with one of those $3 screwdrivers with the plastic handle.
A jig for supporting the slides while mounting - described below.
Old rag (the drawer slides have grease applied to them!)
Flashlight or work light.
(Possibly) A rubber mallet if you have one - or a hammer. Use this to knock the old drawer
slides out of their plastic holders in the backside of cabinets.)
Pencil for marking holes.
Pieces of wood, or spacers, to add to the cabinet/furniture side (unless you use
backside mounting brackets). This is described below.
Information about drawer slides.
By all means, buy good quality slides. I bought a fairly expensive chest recently, which
had full extension slides, but they were for some reason noisy, and didn't quite have "full extension".
So, I have had excellent experience with "Everbilt" and "Knape and Vogt". I believe "Liberty Hardware" is also
a good brand as well.
NOTE: There has to be 1/2 inch of space between the drawer side and the cabinetry
to allow slides to fit. If you are replacing existing slides (of any kind), the correct amound of space will be there.
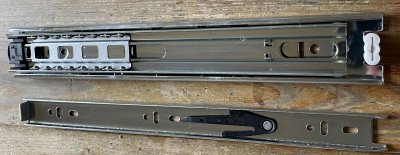
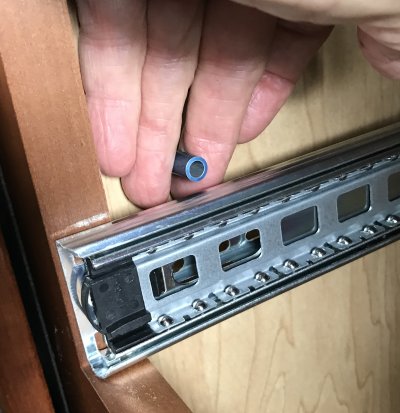
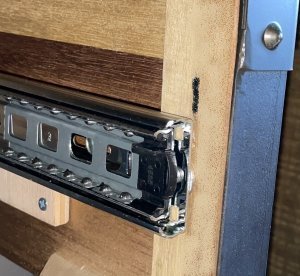
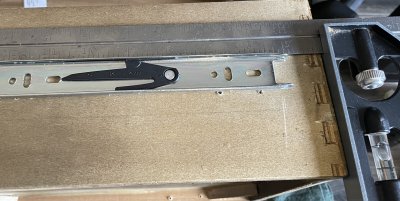
Here is one set of a pair of drawer slides (with the "drawer member"
removed). The "cabinet member" is on top and the "drawer member" is on the bottom.
To remove the drawer member, pull the black plastic catch to one side. When mounted, and you
want to remove the entire drawer, you will find that you have to pull the plastic catch down on one side and pull up
on the opposite side to disengage the drawer.
|
 |
 |
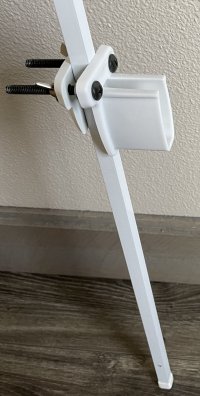
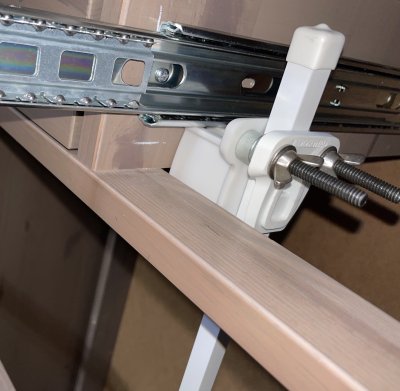
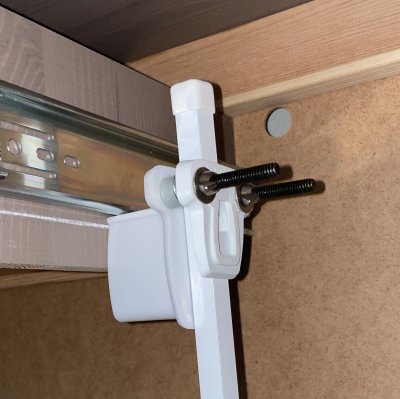
Jimmie's "Extra Hand Tool"
(Useful for holding the back of a drawer slide while you mark its position or drill a hole for mounting.)
|
The slender pole is available in the "closet and storage" section of the big box
home improvement stores. It's normally used to support the front side of several shelves, and is called a
"support pole".
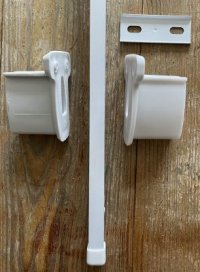
You will need two plastic "wall brackets", or one wall bracket and a piece of slotted metal/angle iron.
It could be something like the little metal strip shown here - with the two slotted holes - which is usually included
with folding door hardware. |
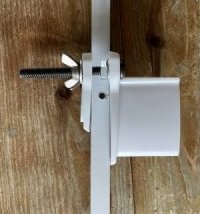
I used one wall bracket on one side and a smaller bracket on the other side (I cut
off the part that sticks out). They are attached with two bolts and wing nuts. You can then slide the support
assembly up and down the pole. This can be used any time you need to hold up something such as perhaps
a cabinet door while you mount it.
I show pictures of "Jimmie's Extra Hand Tool" (being used to hold up the back side of "Cabinet
members") in the Installation section below. |
 |
 |
Before we begin, a NOTE about Ikea, Sauder, and other self-assembled furniture:
The existing "Euro" drawer slides hold the drawer together! The picture on the left shows the
slide still attached, and the picture on the right shows that once the slide is removed, the drawer bottom now
moves freely in its wooden channels.
Just secure the drawer bottom with some small screws. #4 x 1/2 inch should do fine. This will also
strengthen the drawer.
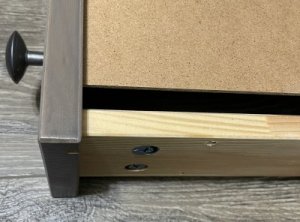
Further NOTE: There's a lot of "assembly hardware" in the way. Note the nylon caps in the
left picture and the metal "cam locks" on the right picture. So make sure you position the new drawer slide
sections so that the "drawer member" won't end up on top of these items. Mine actually ended up on top of
one of the nylon caps, so I simply knocked off the top with a sharp putty knife. |
 |
 |
SAFETY WARNING FOR CHESTS
If you add full extension drawer slides in chests that had standard slides, the drawers will come out further, as
intended. But this may make the chest more likely to tip over. So make sure you do add the safety
anti-tip device!
Did you toss it when you bought the chest? Just put a small to medium eye hook in the back of the chest
and another in a wall stud. To find a stud, tap gently with a hammer while holding your hand against the nearby sheet
rock. When the hammer strike sounds more "substantial" and the sheet rock doesn't shake so much, you have likely
found a stud. You can confirm by driving a small nail into the sheet rock. If you have to do this more than once, just fill
in the holes with a bit of "spackling putty". You actually won't notice them, but if you do, just touch up with matching
paint. Then drill a pilot hole and attach the eye hook (should be at least about 1 1/2 inch long).
Then connect the eye hooks with stout twine or a nylon tye-wrap,
|
Step 1: Determine HOW to mount the
"Cabinet member".
The front of the cabinet member mounts directly against the wood frame of the cabinet or furniture.
But the back side of the member will need some sort of support.
In some cases, a vertical wood surface will already be there.
In others you might need to add pieces of wood, or spacers.
Or it might be easier to use "backside mounts".
In the case of the high-end dresser, all I was doing was replacing the original
full extension drawer slides with ones that were quieter and had more "extension". |
So the process was simple: I simply mounted the cabinet member and the
drawer member in the exact same spot as the originals.
So this was a "D.I.Y. 3" degree of difficulty! I maybe lied about it starting at "5". But just wait.
It goes downhill from here! |
 |
 |
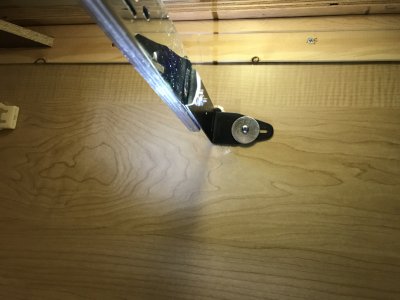
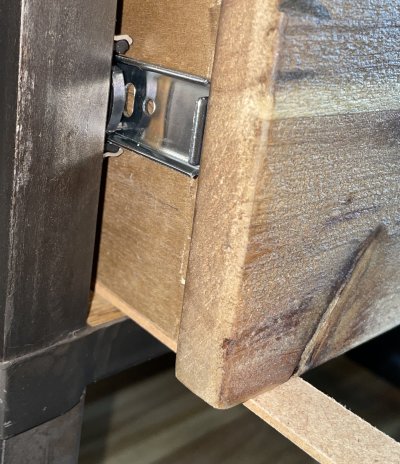
In all other cases, you will probably need to add pieces of wood or use spacers
to mount the cabinet member. (But see "Alternate 2: backside mounts" below.) Here is the inside of a night
stand. This stand actually had no slides at all! The drawer rested on the little brown piece of plastic on the bottom
member of the drawer opening. It was hard to open and only came out about 2/3 of the way.
So I added a piece of wood on each side to hold the cabinet member. Because of some initial
mistakes, this is the one which was a "D.I.Y. 11"!! I actually ruined the new drawer slides and had to buy
another set.
|
And here is an Ikea chest. It had the "Euro" slides, so that the drawers
also came out perhaps a little more than 2/3 of the way. It was about a D.I.Y. 6 or 7.
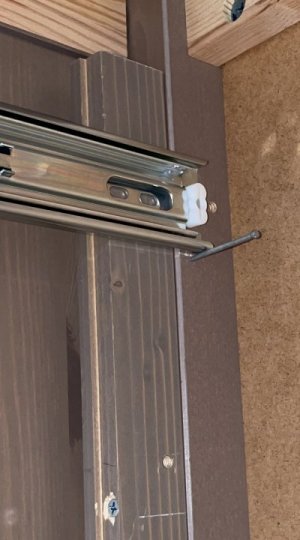
The new slides didn't quite reach the back wood frame, so I added a long piece of wood (from
disassembled Ikea furniture) in front of the original frame, so that I could mount the back sides of the
new slides. I had already partially mounted one of the new cabinet members in this picture. Its back
end is temporarily suspended on the finishing nail - to hold it in place until I can drill for the mounting
screw.
(More on mounting later.) |
 |
 |
Alternative 1: spacers
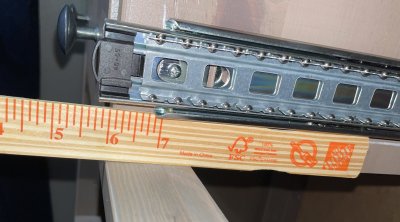
In all my kitchen and bathroom cabinets I used spacers instead of adding pieces of wood. I happened
to have an assortment of about 5 sizes of spacers. Here I am measuring one by holding a cabinet member
in place.
Don't happen to have spacers lying around? You can measure this distance and buy some at
big box or hardware stores.
|
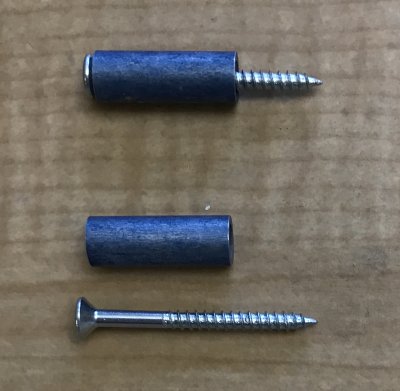
You will be needing sheet metal or wood screws that are a bit longer than
the spacer. |
 |
 |
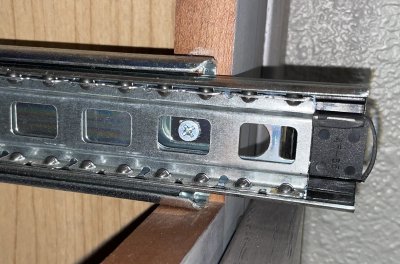
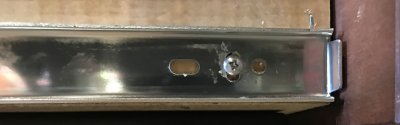
Here's a mounted cabinet member, using spacers.
NOTE: If you are mounting on a piece of cabinetry/furniture whose other side
is visible, make sure the screws aren't long enough to break out of the other side.
NOTE: If the piece of cabinetry is not "real" wood, that is, if it is "MDF", "Pressed
wood chips", and the like, this material is weak. You will need to use at least 4 spacers and screws
to support the drawer. However, if you are working on a section that backs up to a wall, you can use
screws long enough to go completely through the material, and this will be plenty strong.
|
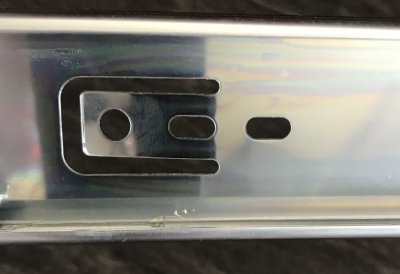
TIP: Bendable tabs.
Drawer slide hardware
has a provision for "tweaking" the spacing between the slide and the cabinet/furniture. Along the length
of the slide cabinet member are bendable tabs. Here's one. |
 |
 |
Here is a top view of one of the tabs bent outward. As a side benefit,
using these tabs provides a bit of "give", so the the cabinet member can flex a bit to accomodate drawers
(or your installation!) that aren't quite square. |
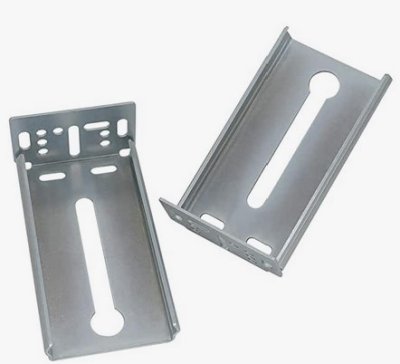
Alternate 2: backside mounts
You can avoid mounting pieces of wood or using spacers in many cases by using backside mounts.
Here's a pair shown here. Note that they're not very long! My 22 inch kitchen/bath cabinet slides
didn't reach back far enough.
|
 |
 |
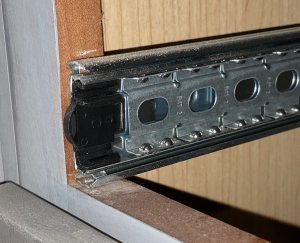
If your slides won't reach the normal backside mounts, you can use the
pieces of wood or spacer method. OR: you can buy "angle brackets" in the specialty section of the
store. In this case, I had some old CB radio mounting brackets. I just cut one side off.
|
And here is one mounted. |
 |
 |
Step2: Determine WHERE to mount
both the cabinet member and the drawer member.
For "overlay" cabinet drawers:
In "overlay" cabinets, the cabinet doors and drawer fronts extend over the opening. When closed,
the drawer front lies against the cabinet frame - the "face frame". Thus the up/down position of the drawer is
less critical, since the drawer front doesn't have to fit inside the cabinet opening. So for these types of cabinets
(or furniture):
The cabinet member can be mounted about 1/16 in behind the front surface, and the
bottom of the cabinet member can be right on the bottom surface.
The drawer member goes right up to backside of the drawer front, and is flush with the bottom
of the drawer.
|
Image showing a typical "overlay" cabinet drawer |
Here's the cabinet member. It's about 1/16 in behind the edge, and it is right
down against the bottom of the frame. |
Here's the drawer member. It's right up against the backside of the
drawer front, and flush with the bottom. |
 |
 |
 |
For furniture drawers that fit inside the "face frame":
For most furniture (and some cabinets), the drawer front fits completely inside the frame of the furniture.
For these types of furniture:
The cabinet member is mounted back from the edge of the opening, by the thickness
of the drawer front (usually about 3/4 inch). (Otherwise the drawer won't close all the way. It will hit the cabinet
member.) Vertically, the bottom of the cabinet member usually can't be mounted on the bottom surface. See
the installation section for tips on deciding on the vertical position of the cabinet member.
The drawer member goes right up to the backside of the drawer front. Vertically it has to
match the position of the cabinet member (tips on how to do this are in the installation section).
|
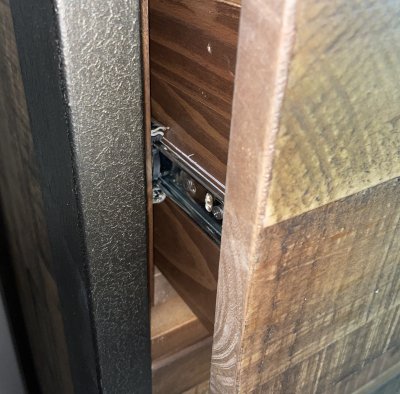
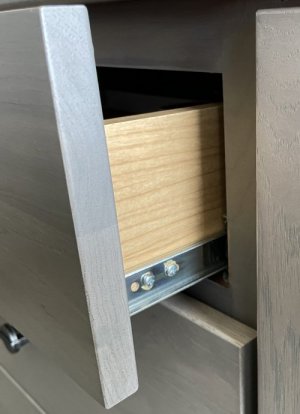
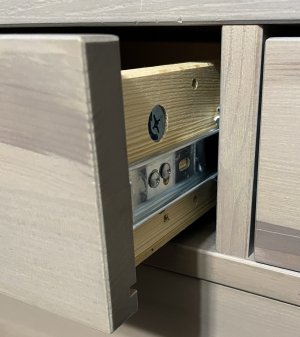
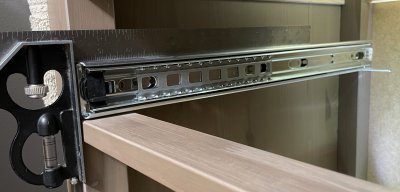
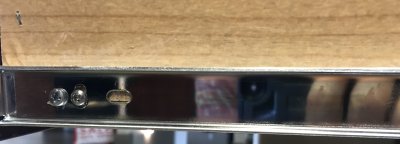
Here is a night stand. The drawer front fits inside the opening. |
The cabinet member is mounted about 3/4 from the metal frame edge. |
This furniture chest actually had a wood stop that is inset, and the drawer front
closes against it. So you can mount its cabinet member flush with the edge that wood stop. |
 |
 |
 |
This is an Ikea chest. The drawer front fits inside the opening. |
So we mount the cabinet member 3/4 inch back. |
|
 |
 |
|
Step3: Installing Your Drawer
Slides
Remember:
The "cabinet member" is the larger assembly that mounts on the cabinet sides.
The "drawer member" is the smaller piece that mounts on each side of the drawer.
The Cabinet Member:
Mount the front of the cabinet member first, using the round hole that is right at its edge.
In the case of "overlay" cabinet drawers, you can simply rest the cabinet member right against the
bottom of the drawer opening, as noted above. Further, you can simply mount the drawer member flush with
the drawer bottom. "Why can't I mount all cabinet members on the bottom?", you might ask. Because the
drawer front hangs over the opening on all sides in "overlay" cabinets. It so happens that if you mount the
drawer slide components like this, the result is that there is about 1/4 inch of space from the drawer bottom
and the cabinet opening bottom. This works because the front of the drawer covers the opening, so its exact
position is not important.
For furniture type drawers, the drawer front fits inside the drawer opening, so you have to
install the drawer slides such that the drawer front is centered between the top and bottom of the opening.
So we mount the cabinet member somewhere above the bottom. The exact position is not critical, so
you can use something like a paint stick to position the cabinet member an inch or so above the drawer opening
bottom. (But do see the above comment about Ikea/Sauder type self-assembled furniture. You might have to
adjust the vertical position of the cabinet member to clear some of the special fasteners used in the drawers of
that type of furniture.)
|
Mount the front of the cabinet member first. This is one of the "overlay" cabinets,
so we can mount the cabinet member right against the bottom of the drawer opening. Make the vertical edge
be about 1/16 inch from the front of the frame.
|
Here is a furniture drawer. Use a paint stick or something to set the height of the
cabinet member. This makes it convenient to do more than one of the same type of door. Make the
vertical edge be about 3/4 inch from the front of the frame. |
 |
 |
Having mounted the front side, we want to secure the back side. Here's
one way. All you have to do is hold the square against the front of the face frame AND hold the cabinet
member against the square AND try to mark the back or hold a nail in place so that you can try to tap it
in with a hammer before it moves! (While you are on your knees leaning inside a dark cabinet trying to
reach through one of the openings.)
Sounds easy, doesn't it?!?
So the next images show some alternates.
|
These are my kitchen cabinets. All the top drawers were the same distance
from the top of the cabinet (as were the drawers in the bathrooms). So in a case like this, you can attach
a piece of wood to a paint stick, so that you can hold it in place, with the cabinet member resting on it. In
this case, I was holding the assembly against the top of the cabinet. Clearly, attaching a piece of wood
to a longer stick that will reach the bottom would probably be even better. |
 |
 |
OR: Here is "Jimmie's Extra Hand" tool. You hold it against the bottom
of the slide, right close to the front, to get the proper height. Then tighten the wing nuts.
|
Now you can move it to the back and support the cabinet member while you mark
the hole. Or you can just drill a pilot hole without marking, since the cabinet member is relatively stable.
If you are using the bendable tabs (one shows in this picture), place the screw in the tab
hole.
If you are securing the cabinet member on solid wood surfaces, one screw in the front and one in
the back should suffice - unless the draw and its contents are unusually heavy.
|
 |
 |
The Drawer Member:
In the case of "overlay" cabinet drawers, the drawer member can usually be mounted such that its
bottom is flush with the bottom of the drawer.
For furniture type drawers, the drawer member has to match the position of the cabinet member.
This is not easy to measure because the bottom of the drawer does not rest on the bottom of the
cabinet/furniture frame. If you want to try measuring, the center of the drawer member is 7/8 inch above
the bottom of the cabinet member. Othewise, the paragraphs below show some ways to line up the drawer
member with the cabinet member.
|
For the overlay cabinet type, mount the drawer member against the drawer front,
with the bottom of the member flush with the bottom of the drawer. Drill the pilot hole through the center of
the vertical slotted opening and position the member in the middle of that opening before tightening the screw.
This gives room to tweak the drawer up and down a bit.
|
Here's a furniture drawer. An easy way to position the drawer member is to place
the member into the mounted cabinet member. Now place the drawer in the opening, on top of a paint
stick or other item that matches the drawer-to-frame clearance - usually about 1/8 inch.
Now mark a spot in the center of the vertical slot - or just go ahead and drill a pilot hole there. NOTE:
the picture really should have shown the drawer pulled out just a bit more, to expose the vertical slot.
Now remove the drawer and the drawer member, and install a screw in the front, where you have marked
or drilled the pilot hole.
Another way to determine where to mount the drawer member is to place the drawer on some
boxes and other objects until it is lined up with the front of the opening. Then mark the center where the
drawer member will be mounted. |
 |
 |
Now use a square to make sure the drawer member is parallel with the edge,
(or measure if you don't have a square). Attach a screw in the back vertical slot, in the middle.
|
Here's a drawer member with screws in the middle of the vertical slots. (It's
probably sufficient to just place a screw in the front and back only.)
Now measure where you positioned this drawer member and install a member on the opposite
side of the drawer.
|
 |
 |
Now carefully insert the drawer in the cabinet
members. Usually it's easier to place one side in first, takeing care to slide the drawer member into
the cabinet member a bit, then place the other side in its cabinet member.
Now (after making sure the drawer slides are engaged properly) slowly push the
drawer inward. It should go in relatively easily, until it encounters some resistance when the black
clips engage. About 2/3 of the way in, you will feel some more resistance. This is normal.
The first time a drawer is inserted in these type of slides, there is a good deal of resistance. It can
feel really tight. Push it all the way back. Then you should be able to move the drawer in and out easily.
If the drawer is simply too tight, make sure you have the drawer members parallel to the drawer
bottom. (If they are not parallel, or the cabinet members are not parallel, the drawer may bind.) If everything
is straight, maybe the pieces of wood (or the spacers) are too thick. It will be necessary to
use thinner pieces of wood or slightly shorter spacers.
If the other side does not quite reach its cabinet member, the drawer is too narrow.
This should not happen if you are replacing existing slides. The proper clearance should be there. But if you are
adding slides when none were present, it might be too narrow. In this case, it will be necessary to
remove one of the cabinet members and use the bendable tabs. Just bend the tabs to approximately
match the shortage. If the shortage is somewhat large, then use the tabs on both cabinet members.
Final adjustment:
"Confusion" note: Moving a drawer member UP on a drawer causes the drawer to move DOWN!
Check the position of the drawer (up and down). If it's not right (one or both sides too high or low) loosen
the front screw and move the drawer up or down as needed. Still not enough? If you have reached the
end of the slot and need more adjustment, you can drill another hole in the opposite side of the vertical
slot, to give yourself some more adjustment.
For example, the drawer is still inserted into the cabinet, and you are pulling the drawer down, but the
screw has reached the top of the slot. Simply drill another hole in the bottom of the slot. Now remove the screw
from the top of the slot and place it in the new hole. You should now be able to pull the drawer down further.
Tighten the front screws if you have made any adjustments.
Remove the drawer. If you moved the front up or down, now loosen (or move) the back screws and
reposition the back side to match. You can use the square - or measure - to make sure the drawer member
is parallel to the drawer edge.
Now add some extra screws in some of the round holes, to secure the drawer member well. Place the
completed drawer back into the cabinet. Note that there will still be the resistance (about 2/3 of the way in) when
the drawer placed into the cabinet members for the first time.
|
 |
You're DONE! Enjoy your new upscale quiet drawers that now give you full access!