Have you always wanted to do your own graphics and illustrations for blog articles,
or class books, or maybe a technical book you've always wanted to publish? Are you tired of scrounging
around on the internet for graphics that you can use without worrying about copyright issues, and are rarely
what you want?
Further, have you searched for "graphics" tools or "illustration" tools and found a really bewildering set
of choices, some of which are expensive subscriptions?
If so, you might be surprised and pleased that a piece of software that has been around since the
Eniac will do excellent graphics and is easy to learn. O.K., maybe not since the Eniac (the vacuum tube computer
that was built in 1945). The software is Microsoft Powerpoint. If you own a copy of Microsoft Office, you already
have this software available. If not, it "should" be possible to purchase it separately and as a "standalone",
non-subscription purchase. Microsoft indicates that you can still buy Powerpoint, or the whole Office suite,
as a one-time purchase. But do note that their site does its best to lead you to the "Office 365" subscription.
This article will give you all the information - with examples - needed to create very
good graphics and illustrations with Powerpoint. All of the information about creating graphics will apply to both
PC and Mac. But any "computer-related" things like "Save" will apply to PC only.
Note: all information and screenshots are based on Powerpoint 2013.
"But how will I transfer the graphic to Word or to my HTML article?" you might ask.
Use screenshots! Screenshots used to be grainy and fuzzy. But with the newer high-resolution monitors
and newer operating systems, screenshots are quite sharp. Windows operating system comes with "Snip and Sketch",
which you can configure to let you specify a window area to capture.
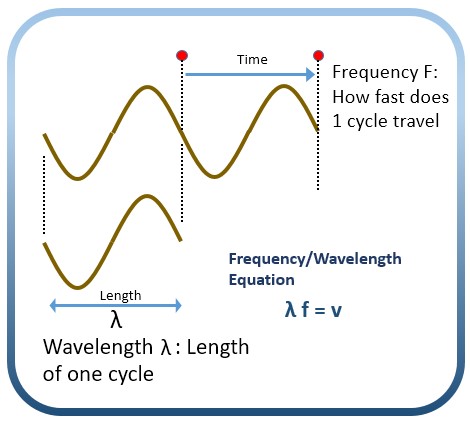
Here's a full resolution screenshot, of a Powerpoint graphic. |
 |
Some Initial Notes
As you probably already know, you can find Powerpoint in the famous "Start Menu", under "Microsoft Office XXX". But here's a suggestion for easily opening Powerpoint, Word, or for that matter any program/application.
Open Powerpoint
Select "Blank Presentation". If you are going to be doing graphics only, select and delete the "Click to add Text" and "Click to add Subtitle" text boxes. If, like me, you have never used Powerpoint before, you will find that you have to select by clicking/dragging a big window that is wider than the two square outlines. Then you select the "Delete" key.
Then select "Save as". I like to use the name "aaaa_powerpoint_OPEN". The "aaaa" prefix makes it show up at the top of the list in a given folder/directory. Save it to some directory that you will be using. (Otherwise it will go to "My Documents")
Hint: Do the same with Word, and possibly other programs that you use regularly.
Now, when you want to open Powerpoint, just click on "aaaa_powerpoint_OPEN" and hit the Enter key.
(Or double-click, it that's your preference.)
Bonus: You can customize the slide to include gizmos or text that you expect to use regularly.
Frustration Alert 1 A note on "Window Focus":
Do you ever notice that when you have been working on a Word document, and then you leave the Word
document, and then come back to Word and you click the "Save" icon and then click close or exit, Word will
present the message "Do you want to save XXX?", with the choices "Save", "Don't Save", and "Cancel"?
"But I just did Save", you might say.
This is because the first click (the one where you "thought" you were clicking "Save") only established
"Window Focus". You have to click "Save" one more time to actually save the document. This seems to be particularly
prevalent with Powerpoint. You might notice that you'll be working on a Slide, then you go to a different window -
maybe to play some tunes - and then come back to Powerpoint and maybe try to select something. The first click
didn't do anything but establish Window Focus. So it would be well to click once when you come back to
Powerpoint, before trying to do something.
Creating Graphics
Before we show how to use "Shapes" in Powerpoint, here is some preliminary information on Grids, Selection, Move, and Copy
Frustration Alert 2 You might be tempted to open up Powerpoint and fiddle with shapes. You know you want to! But read the following sections FIRST! (Especially if you can't wait to try entering TEXT!!) Powerpoint's "Move" and "Copy" protocol is UNIQUE. It ain't what you are used to!
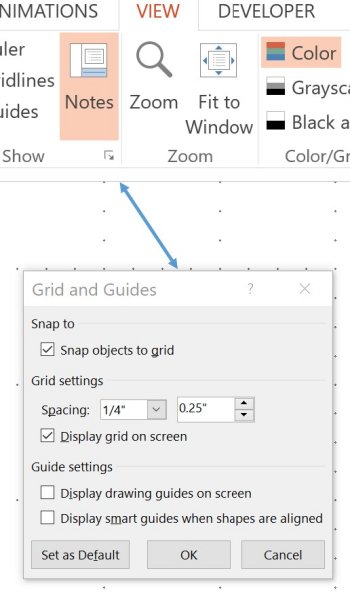
1 The Grid For most items, "Spacing" of 1/4" works fine. For smaller items, I find 1/16" to be useful. If something won't line up quite where you want it, try 1/24", or turn off "Snap Objects to grid" Note that the second number in the "Spacing" line is the decimal equivalent of the first number. |
P.S.: Turn off the grid before making your screenshot! As you can see here, it will
show like this in the finished image! |
 |
 |
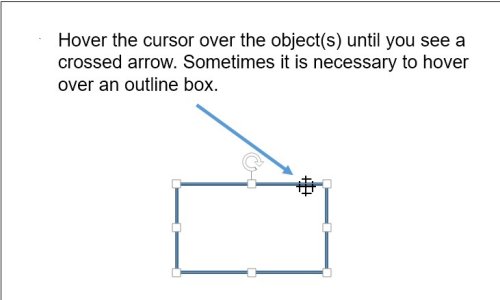
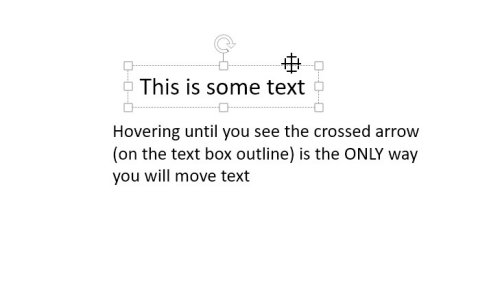
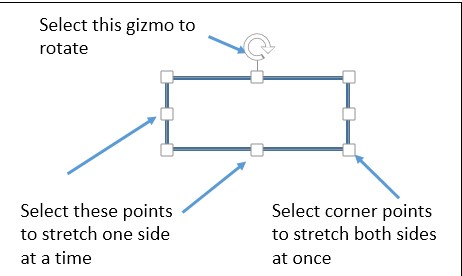
A note on selection:
You can select many objects by just clicking on the object. Or you can select by clicking a point (usually
to the upper left of an object) and dragging to the opposite corner - to create a "selection window" around the object.
Do the same for more than one object. Just include the objects in the selection window.
"Irritation" Note: if the first point is inside another object, and then begin to drag, you will notice that
Powerpoint will automatically select the object and move it. In these cases, you can select the "Undo" arrow and then
try to select your desired object(s) by clicking elsewhere. For example, it is not necessary to always click the upper
left area of the object(s) first. You can click the lower right first, for example.
If you want to select more than one object by clicking on each one, Use "SHIFT", not "CTL" to add shapes!
Yes, holding the "Ctl" key works for just about any other Windows program, but not Powerpoint!
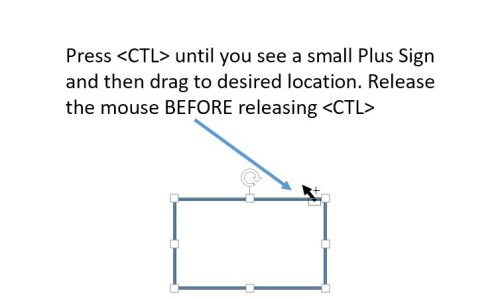
2 Move |
|
 |
 |
3 Copy. |
|
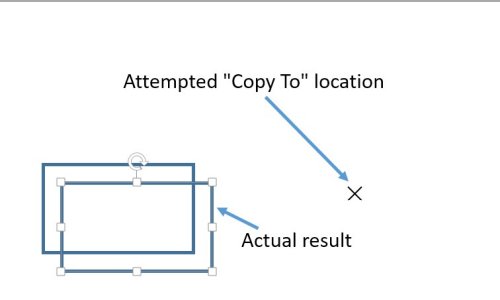 |
 |
Selecting and placing "Shapes"
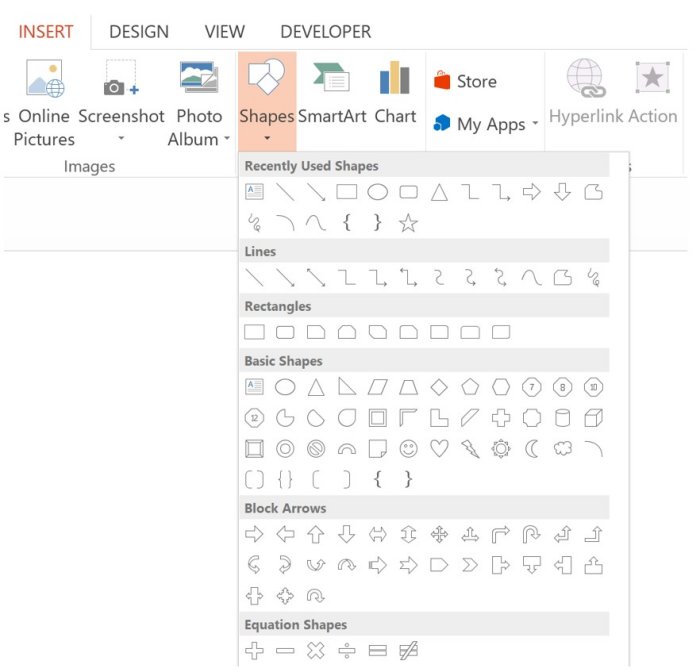
To insert any kind of shape, click the Insert tab and select Shape.
You will get this dialog of available shapes. |
 |
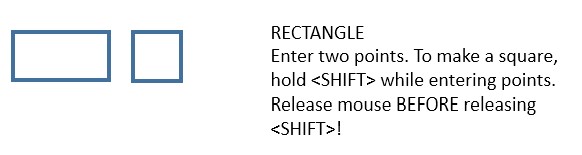
4 Insert Shape - Rectangle. |
When you finish clicking the two points, the rectangle |
 |
 |
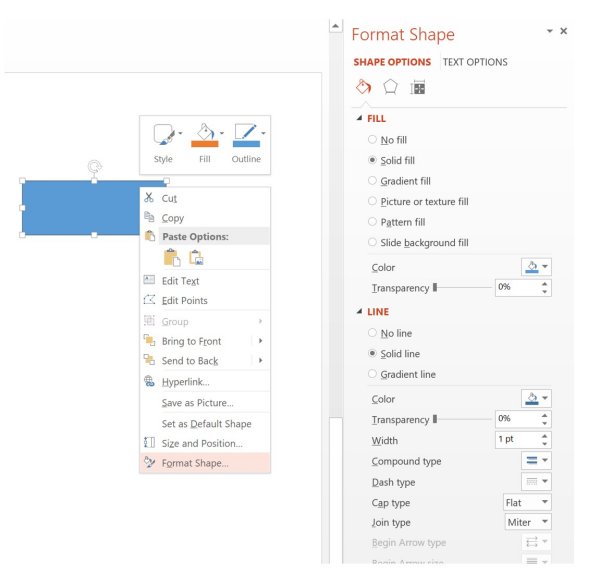
Want to do other things to your rectangle (or any other shape)? Just right click
and select "Format shape". The "Format Shape" pane will appear on the right. All shapes are "one-shot". They do not repeat. If you want to make more than one of
the same shape, then right-click the shape you want, and select "Lock Drawing Mode". 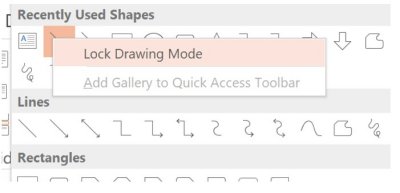
|
 |
|
5 Triangle |
6 Oval/Circle |
 |
 |
|
|
 |
 |
|
|
 |
 |
|
|
 |
 |
|
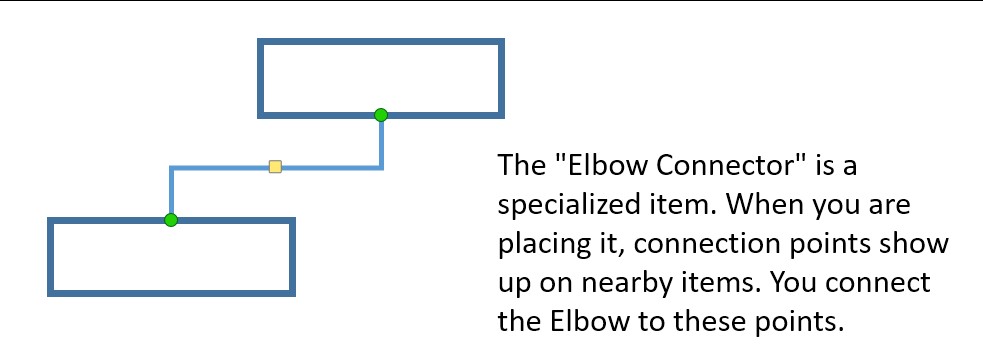
12 Elbow connector and Elbow arrow connector |
 |
 |
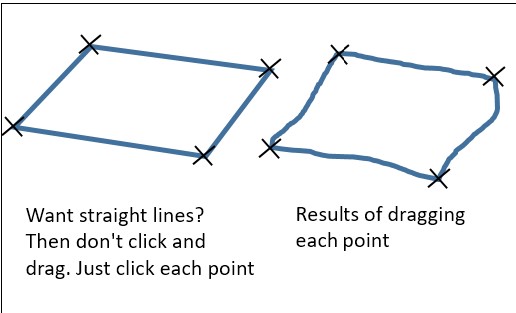
13 The "Freeform" Gizmo |
14 |
 |
 |
15 Getting the RIGHT menu for right-click |
 |
Final tidbits
Multiple instances of a particular shape:
Tired of placing more than one shape and having to edit things like line width each time?
First of all, Powerpoint will let you set shape characteristics on multiple shapes at once.
Or, after you place a shape, you can select it and right-click and select "Set as default". Then subsequent
shapes will have the same characteristics.
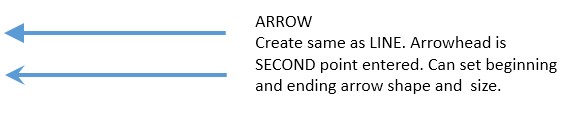
Frustration Alert 4!! But don't select an arrow shape and select the
"set default" choice! You will notice that when you select an arrow and right-click, the menu says "Set as default
line." And it means what it says: From then on, all lines will be arrows!!! And you can't place a new
line to unset this default, because it will be an arrow.
To unset, go find a line somewhere on the slide or on another slide in the same presentation, and Select "Set
as default line". Don't have a plain line in the whole presentation? Well, then you're basically screwed, bud. Actually, no.
Open up a new Powerpoint on another presentation, place a line, then copy the line into a slide on the "flawed"
presentation and select the line and do "Set as default line!!"
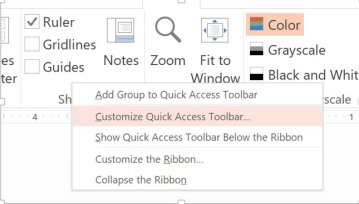
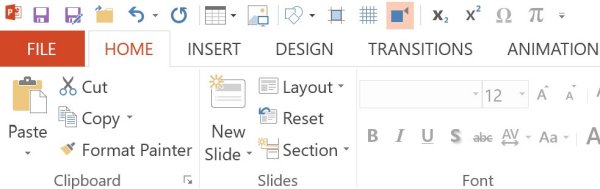
Customizing the top toolbar:
If you will be using Powerpoint for graphics on a regular basis, you'll find it a lot more convenient to
create buttons for commonly used items. For example, You can create a one-click button for "Shapes", to replace
selecting Insert. . .Shapes each time. And it will certainly be more convenient to click a button for
the grids commands instead of clicking the little bitty box near the "Show" category.
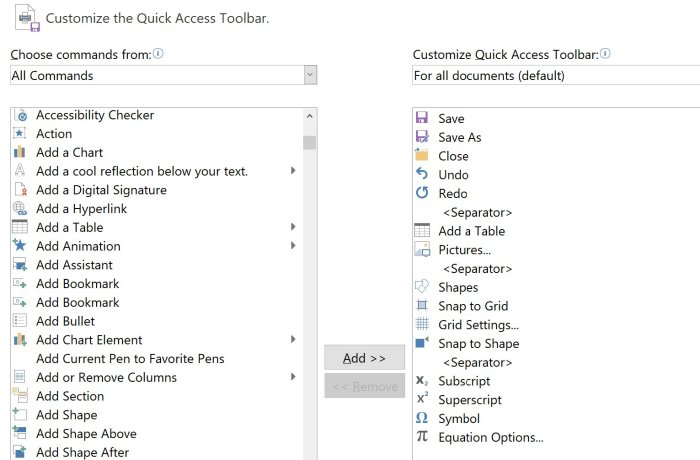
The very top toolbar in Office programs is called the "Quick Access Toolbar". It's the one with "Save", "Save As", and a few others.
The "main" toolbar, with all the tabs, is called "The Ribbon".
|
You will get a dialog that looks like this. |
> |
 |
Here's what my customized "Quick Access Toolbar" looks like: |
 |
Copyright © 2023 J.A.