If you have a kitchen that is either worn-out or that has colors and styles that you just
don't like, the phrase "kitchen remodel" comes up. You start to browse kitchen cabinet catalogs or check out
Pinterest or other sites and find alluring, opulent (and staged) images of spectactular cooking areas.
Then up comes the subject of Collateral Damage (to your wallet). "Operation Kitchen Remodel" is an
undertaking that starts at $20,000 and goes up from there.
Sigh. . .
But it doesn't have to involve calling out your retirement account troops. The main part of your kitchen
(other than appliances) is the cabinets. And you don't have to replace the cabinets. You simply "reface" them.
If the cabinet "boxes" (the interior portions) are in good shape, you can update the cabinets by
replacing the doors and also the drawer fronts.
In my case, the total cost to reface all the cabinets in the entire house was about $5,500! And this
included a premium species of wood, along with a newly-introduced stain.
So, how easy is this? while non-trivial, it's actually not too bad, especially if the "overlap" is such that not much of
the front frame shows between the doors and drawers (explained below). In this case, you can simply stain (or even
paint) the front frame.
NOTE: Wood Veneer:
Many sites that discuss cabinet refacing suggest using Wood Veneer to cover the original doors or drawers,
and sometimes the front frame (the "Face Frame"). Wood veneer is simply sheets of very thin wood. You cut this
material and glue it onto the existing surface.
In my opinion, this would likely be quite difficult. For the doors and drawers, the veneer won't bend around
any curved edges. And if the doors have insets or raised panels, you would still have to refinish the (intricate) borders
around the panels. And trying to cover the doors, drawers, or Face Frame with strips of veneer requires a MUCH
higher skill level than sanding and staining/painting.
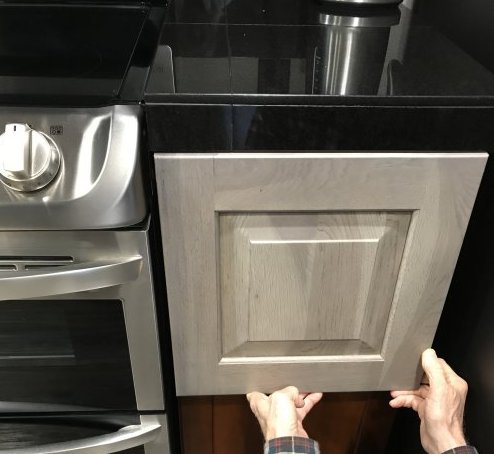
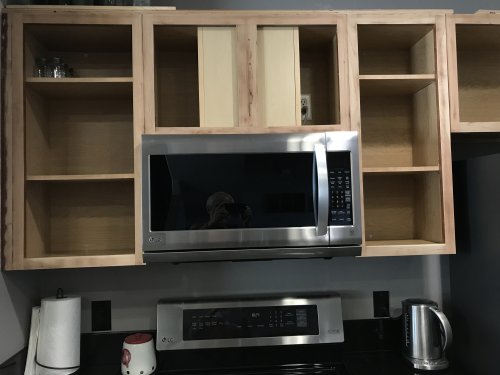
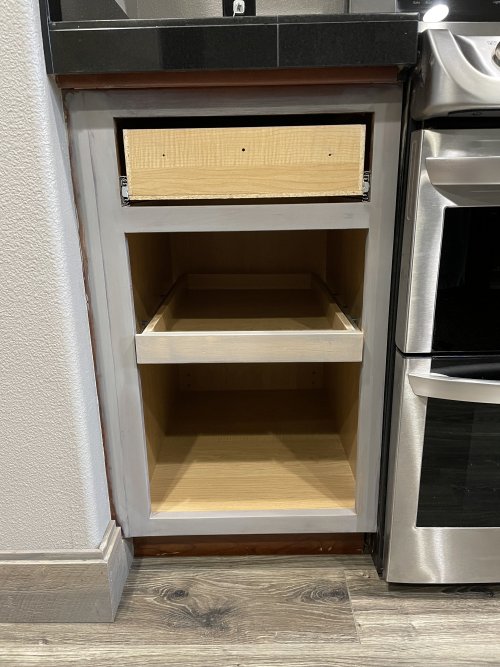
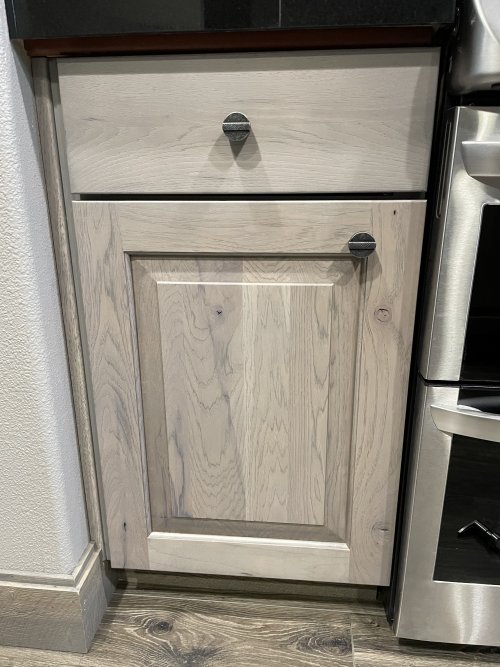
Let's Start with the "Before" and the "After"
Before |
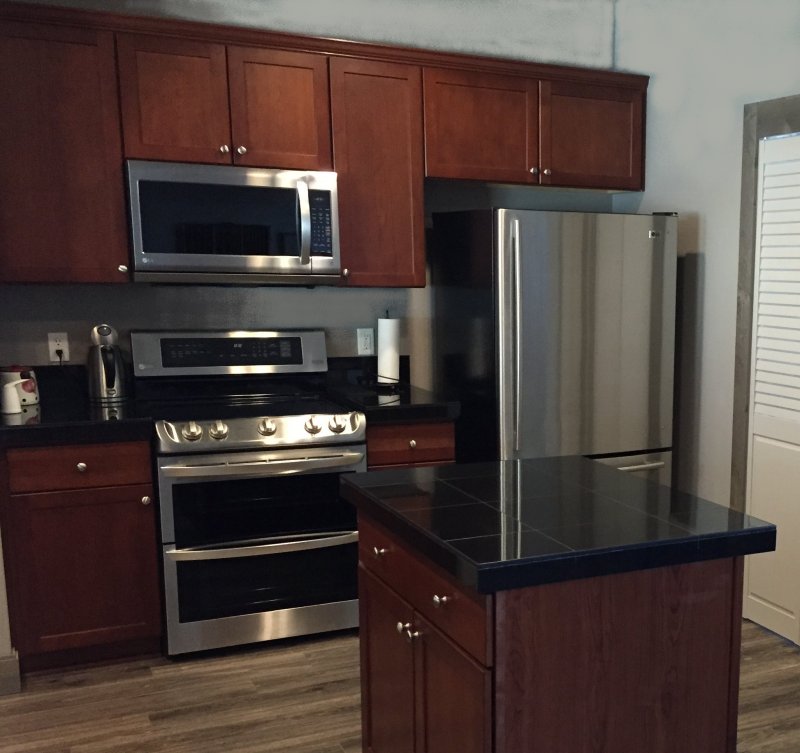 |
After |
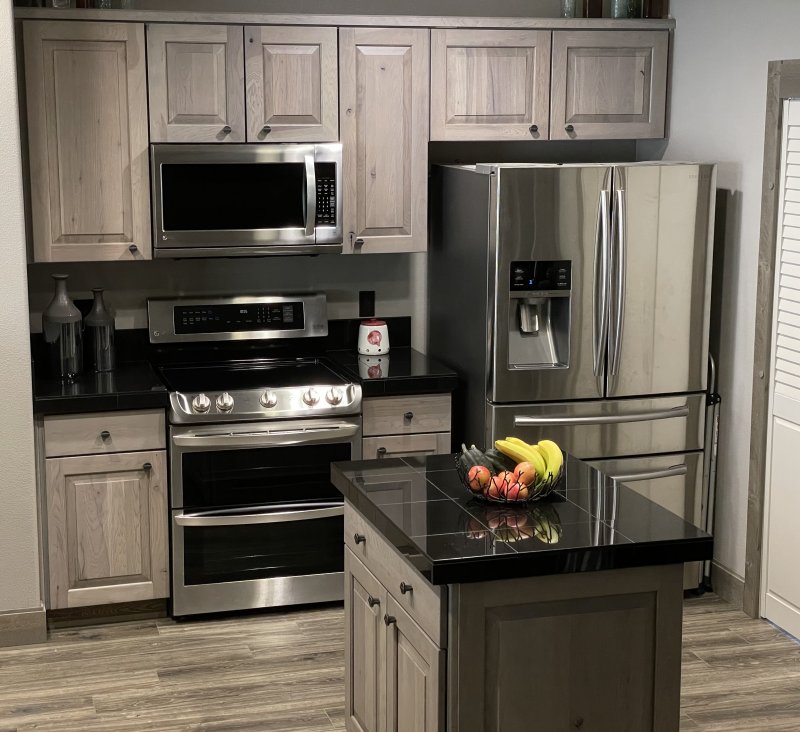 |
Planning the Cabinet Reface, and ordering material
First of all, inspect the cabinets you currently have. The interior of most cabinets is
"MDF" (Medium Density Fiberboard). This is essentially wood particles that has been glued together into panels
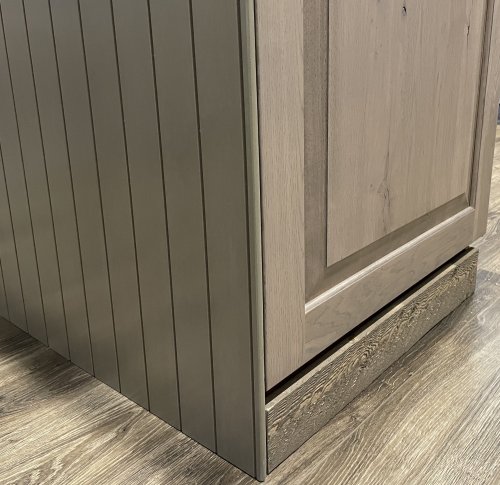
that are about 1/2 inch thick. This material has no tolerance for moisture, so check that your "boxes" are still
in good shape. The bottom section under the sink may be deformed from prior leaks. But if it's not too bad,
you can cover it with rubber material or something similar.
Some cabinet boxes are actually made with plywood. This is much better for wear and resistance to moisture.
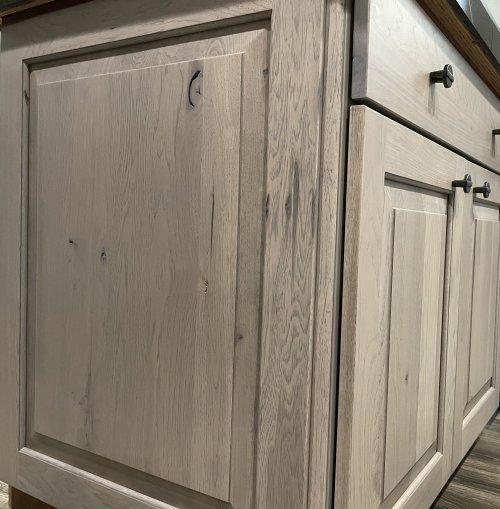
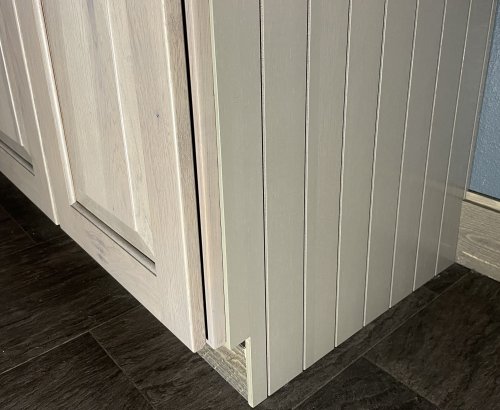
Are the cabinets "Full Overlay" or close to it? This term means the door and drawer edges
are almost touching. So you see almost none of the front frame (called the "Face Frame"). Most of the
time, the Face Frame is solid pieces of whatever wood species the current doors and drawer fronts are made of.
It will typically be painted or stained to match the doors and drawers. If your cabinets are "Partial Overlay",
with more than 1 inch between adjacent doors and drawers, you might have to do more work with the Face Frame
if you change to a different wood species or color. In other words, you will have to more carefully match the
Face Frame to the new doors/drawers.
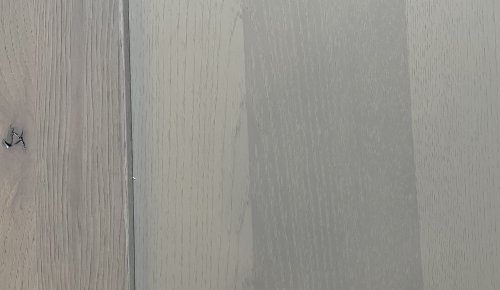
Take a look at the "Before" picture above. Note that the space between the door/drawer edges is about
1/2 inch. This is great for a reface project, since the underlying face frame is essentially not seen when the doors
are closed. It's in the shadows between the doors/drawers. So in essence, you don't actually have to match the
color/appearance of the new doors and drawers.
"But why can't I just order wider (and taller) doors and drawers?" you might ask. You can order them
slightly bigger (1/8 or 1/4 inch perhaps). But check the available hinges before considering much more than that.
My cabinets use "1 1/4 inch Overlay" hinges. This means the edge of the door overlaps the face frame 1 1/4 inches.
In searching for "Overlay" style hinges, I found a range of 1/2 inch to 1 1/2 Overlay.
Find a dealer that you can work with. I used Home Depot for my project. This makes the remodel much easier, since the sales consultant can work with you on cabinet choices and can navigate the somewhat complex process of ordering the correct materials, including the correct hinges.
You can then go visit them and get some catalogs showing each vendor's offerings. For example, I came home with a Kraftmaid and a Thomasville catalog.
Want to know a bit about wood species and their characteristics? Here's Kraftmaid's article:
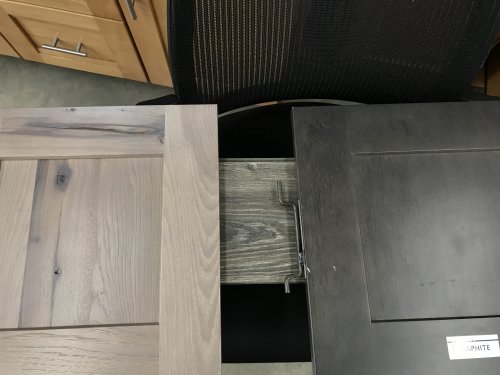
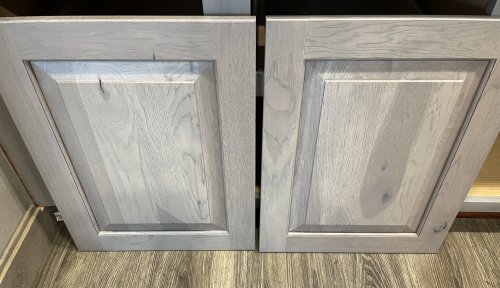
Wood Species1 If you have a piece of your flooring, take it with you to the dealer. They will have door samples for each of their suppliers, and you can see what they might look like against your floor. (Take a picture of your floor if you don't have an extra piece.) This is Kraftmaid's "Cannon Grey" on Oak. |
2 This is Thomasville's Rustic Hickory (stain color unknown) and "Graphite" on Hickory. |
 |
 |
|
|
 |
 |
|
6 Here's the same two doors side by side, illuminated by the kitchen light only - I closed the blind on the dining room window. |
 |
 |
When you have decided on your wood species and stain/paint colors, you can measure all your cabinet doors and drawer fronts and go back to the sales consultant. (They prefer that you make an appointment). Some Notes:
Kraftmaid wants their measurements Height x Width. (I had mine reversed - Width X Height).
You can decide whether to get your drawer fronts as "slab" (single piece of wood) or "5 piece" - a thinner slice of wood with a frame around it. I prefer slab. It's easier to work with, and you will get more of the wood pattern, including knots and irregularities, with "Rustic" choices.
You will need to buy several types of matching moulding. I have pictures and information just below this list.
You can buy some of the matching stain through the cabinet supplier, for use in staining your face frame. But I was unable to get the cabinet supplier to ship it in advance. So I used another stain, and it worked fine. As noted above, most of the face frame can't be seen when the doors and drawers are closed.
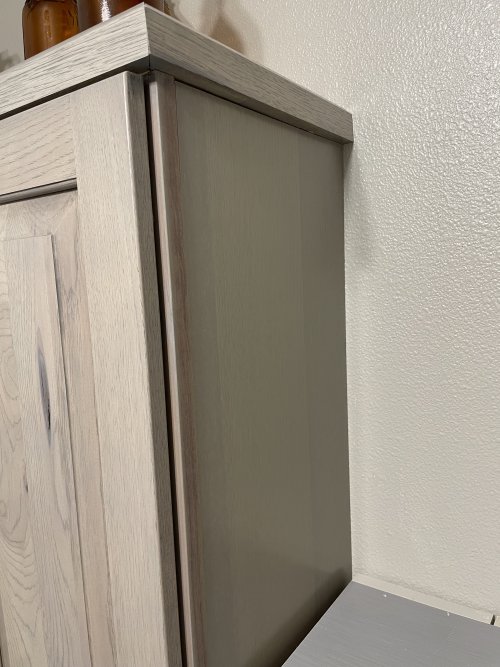
You will likely have end sections that show, on some of your cabinets. For example, the sides
and back of islands, or the sides in bathrooms. I discuss some options on this, with pictures, just below
this list. (Hint: It's usually cheap veneer or plastic coated thin plywood. The cabinet supplier had some which
was not cheap, but it still looked just like plastic coated plywood!
However, the cabinet supplier also had two excellent alternatives! I discuss below.
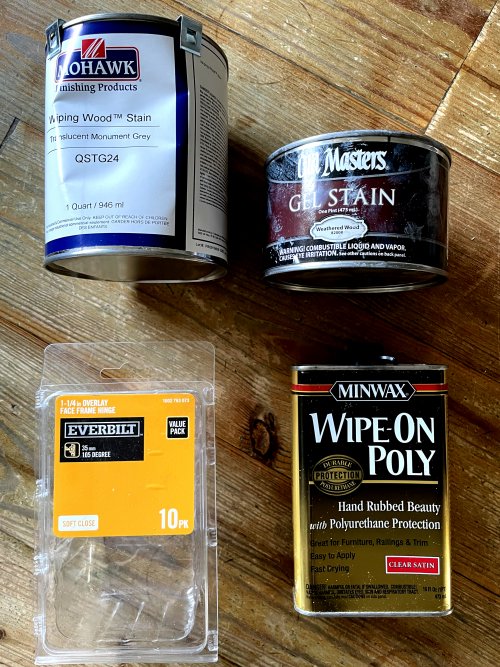
Don't get the hinges through the cabinet supplier! Mine would have been $11 each. The sales rep took me to the hinges/hardware section of the store, where I bought packages of 10 for $4 per hinge.
And, don't get unrelated accessories through the cabinet supplier. I wanted to buy 4 "corbels" (shelf supports) to match the cabinets. They would have been $260 each. She took me to the wood products area of the store, and I bought them for $41 each.
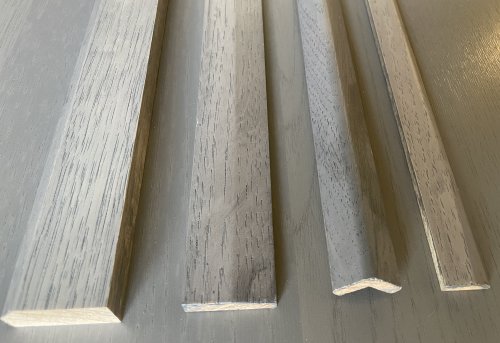
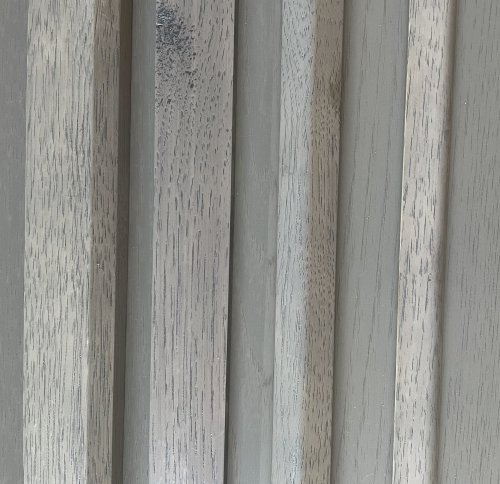
7 Here are 4 types of moulding/trim
from the cabinet supplier. They are solid hickory, stained to match the doors and drawer fronts,
and usually come in 8 foot lengths. (Yours will be in the wood species that you have selected.) |
8 Here's another picture of the same four pieces. |
 |
 |
9 As mentioned above, you might want to avoid the standard end cap material. In this case, the cabinet supplier apparently went cheap on me. This was 1/8 inch plywood covered with an artificial-looking veneer or plastic. The cabinet supplier refers to it as "Wood Skin". Here is a piece placed next to one of the nice Hickory drawer fronts (Hickory drawer on the left, chinzy-looking veneer panel on the right). It was supplied in 3 each of 4 x 4 foot sections, totaling $460! |
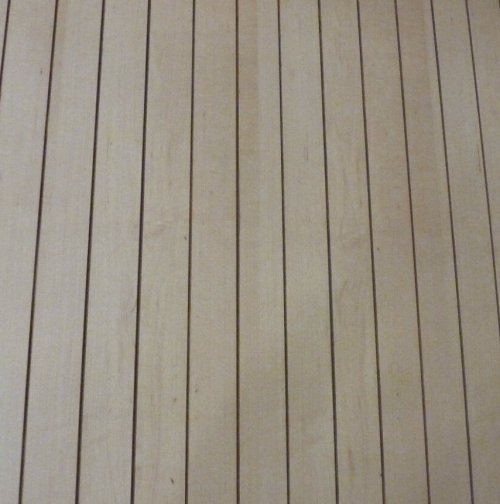
10 I returned 2 of the pieces and went with 3/8 inch "V-grooved" paneling. This is a picture from the cabinet maker's site. See sections 30A and 30B for pictures of this V-grooved paneling installed. BUT: also see section #27 ("Mounting the end caps") for a really nice alternate - an end cap that matches the doors!) |
 |
 |
11 You will also need some paint or
stain to change the color of your Face Frame, if it is different from the new doors/drawers. The can
with the "Mohawk" brand is from the cabinet supplier. (Yes, it arrived bent!) Since I couldn't get it in advance,
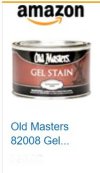
I used the "Old Masters" gel stain in "Weathered Wood" - a light grey. I found the gel type stain to be
very easy to apply, MUCH easier than the liquid type stains. |
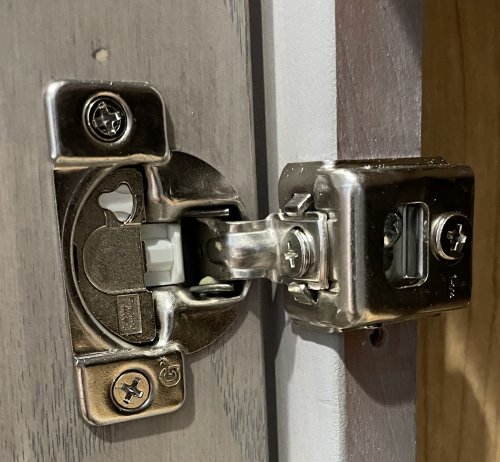
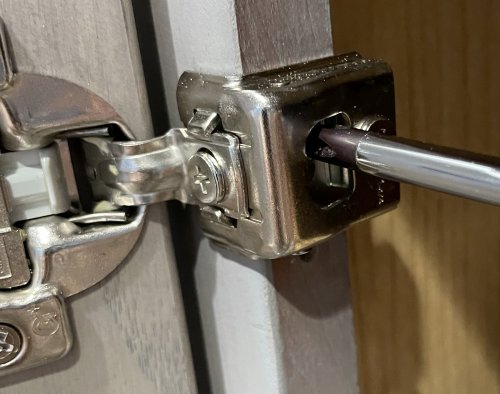
12 Here is a close-up of one
of the hinges. This particular hinge has adjustments for Left - Right, depth, and Up - Down, explained
below. |
 |
 |
The stain is hard to find in stores! Here's a link for buying it online. |
 |
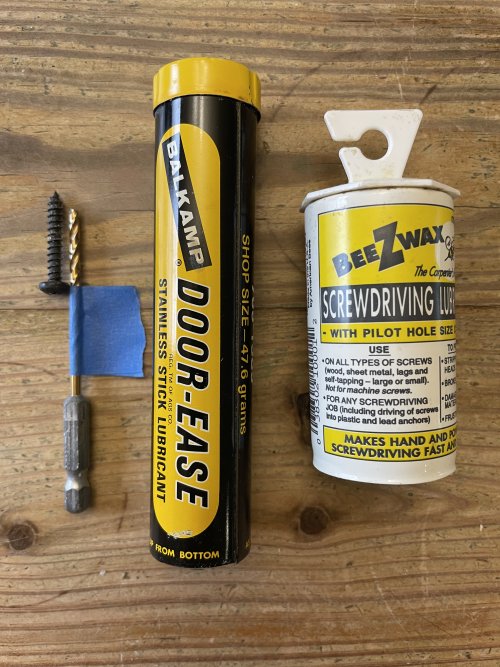
And this is a compound that you apply to screws to make them much
easier to drive. It's discussed in #26 below. You might be able to get it at some auto supply stores. But online beats
hunting in stores! |
 |
Preparing Your Face Frame and Installing the Pieces
Important Note:
When your cabinet pieces arrive (and this may be several months, given the shipping problems of late),
don't put them out in the cold damp garage! While the cabinet maker has (hopefully) dried and cured all the wood,
it's still important to keep it in a dry area. Also, store them on the same floor as the room where they will
be installed, so there won't be any big temperature changes when they are removed from the boxes and
installed.
This is even more important for flooring as well. Wood and wood products expand and contract
with changes in temperature or humidity.
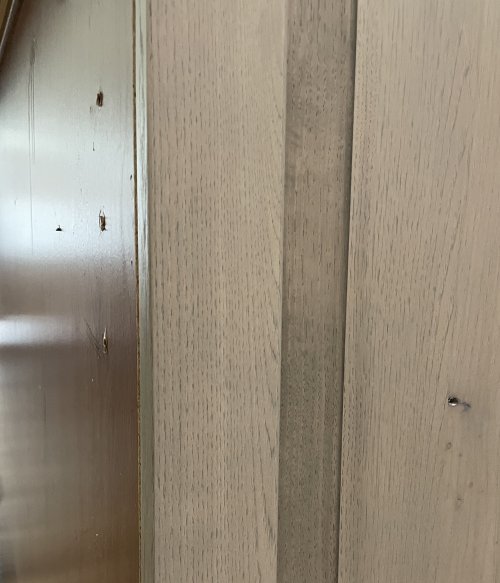
13 Prior to the arrival of your cabinet pieces, you can prepare the Face Frame. Consider doing it in sections, so your entire kitchen won't be torn up at once. I have already sanded off the original cherry stain. More detail on prep work in Section #15 ("Removing the old stain") |
14 Here's the Face Frame in
the master bath. I have sanded most of the cherry stain off here. |
 |
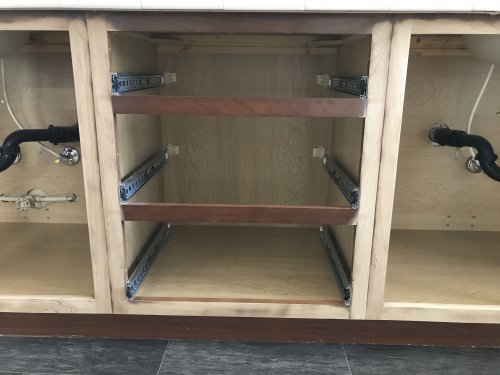 |
15 Removing the old stain: Remove the drawer front(s) and the door(s), as well as the contents. You can sand by hand, but it does take quite a bit more time. Otherwise, a small corner-type sander works fine. 220 grit sandpaper seems to work well. It easily removes the old stain yet leaves the surface smooth enough so you can immediately apply paint or stain. Note that I also sanded the front of the pull out shelf in the middle. It was originally a light-colored maple. You should probably lay old towels or a paint tarp down on the floor - sanding creates lots of dust. Definitely wear a face mask. Note that the side next to the wall has some of the old stain. That's what the "SM8" moulding is for! |
16 Applying the stain. Wipe off all the excess dust. Apply the stain with an old (but clean) rag. Then wipe the excess off with a dry rag. This allows the original grain of the wood to show through slightly. I also stained the front of the pull out shelf. I might have allowed the stain to remain on that piece of wood a bit longer before wiping off the excess. For a more durable finish, apply a coat of the "Wipe-On Poly", or similiar product. |
 |
 |
|
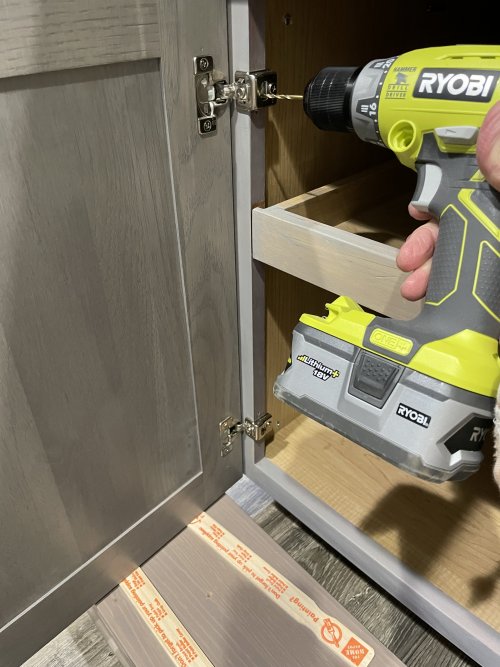
18 Mounting the doors Attach the hinges to the door. Support the door with a stack of wood or other scraps. A couple of paint sticks on top of a stack of old Ikea cabinet pieces provided just the right amount to orient the door where I wanted it. While holding the door, drill a hole for the mounting screw. Drill a hole a bit
less than the length of the screw. This allows the screw to hold tighter. The section of the hinge
through which the screw passes is an elongated slot. This gives you a chance to move the door up or
down slightly for alignment. Note that this picture is a bit misleading, because it shows the drill bit
at the bottom of the slot. You want to try to drill in the center of the slot, so that you have adjustment
up or down. Door didn't end up where you needed it, even with the adjustment? Then loosen the top screw a bit and drill the bottom hinge hole accordingly. For example, if the door is too high and you have run out of adjustment on the top hinge, drill the lower hole at the bottom of the lower hinge slot. Then you have the full length of the slot to move it down further. At this point, remove the top screw and allow the door to move down further. Then drill another hole for the top hinge. |
 |
 |
19 Available hinge adjustments |
20 And this screw allows for a slight forward movement. You can move the door away from the face frame slightly. |
 |
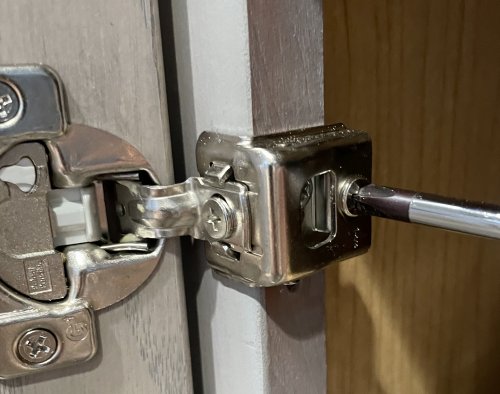 |
21 This allows for moving the door up and down. It's the screw you used to mount the hinge. the hinge has an elongated slot for this purpose. |
22 And this small piece of nylon has
three positions and adjusts the "softness" of the door close. The factory default is maximum amount. The
door will start slowing down about 6 inches away from fully closed. The next position will cause it to slow
down about 2 - 3 inches away, and the third position disables the soft close. |
 |
 |
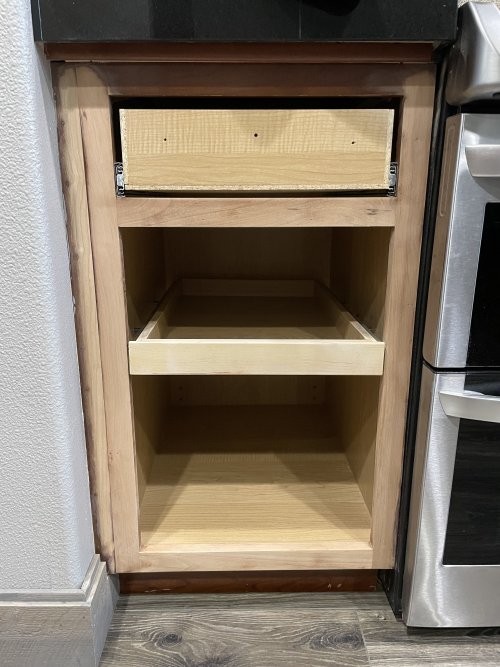
23 Mounting drawer fronts. |
24 Place the new drawer front
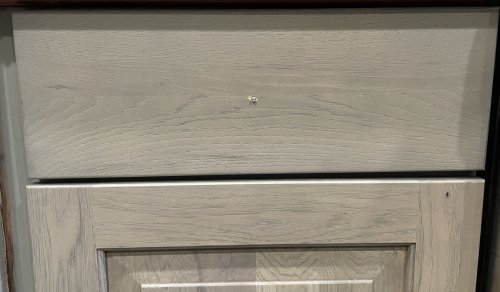
over the knob screw and check the centering of the drawer front. We see here that the drawer front is
a bit too far to the right. |
 |
 |
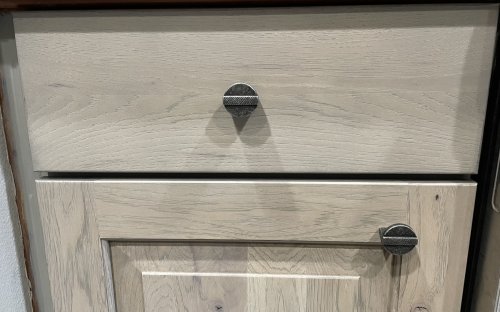
25 Here we see that the drawer is nicely lined up with the side of the door below. Make sure the drawer is lined up with the adjacent doors or drawers, and then tighten the screw holding the cabinet knob. Now you can add the additional screws that stabilize the drawer. You can see the extra holes in the drawer body in pictures 15 and 16 above, where the old drawer front has been removed. Carefully pass a drill bit through the holes from the back and drill into the new drawer, but check out the tips on the next panel first. . . |
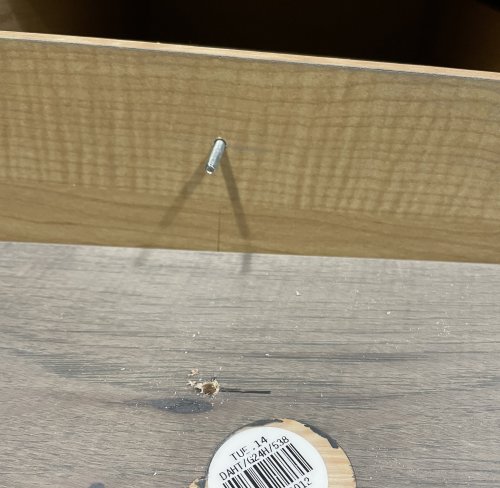
26 To help make sure you won't drill
through your brand new drawer front, mark the depth on the drill bit. Do this by holding the screw against
the drill bit and applying a piece of tape about 1/4 inch less than the length of the screw. This prevents
you from drilling through your new drawer!! (Why 1/4 inch less than the screw length? So the tip of the screw
will penetrate further than the drilled pilot hole. This makes for a tighter fitting.) |
 |
 |
27 Mounting the end caps |
28 I will use the V-grooved panel on the
back of the island. So here's the left side of the end cap. We see the back side of the island, with
the original cherry veneer. Note that the new end cap is flush with the edge. I can now position the V-grooved
material either next to, or overlapping, the end cap - thus avoiding the need for the corner moulding. |
 |
 |
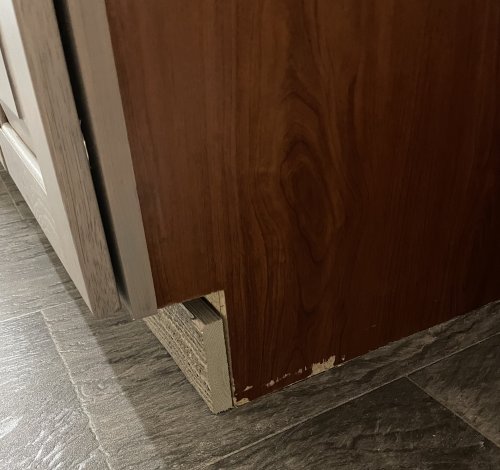
29 Here is the side of the bathroom
cabinet, ready for some kind of "End Cap". Although the original cherry looks good, it's actually just plastic
coating on thin plywood. |
30 I tried a piece of the "Wood
Skin" veneer material as the End Cap. Note that I simply covered the edge of the "Ghostwood" 1x4 floor
moulding which was shown in the previous picture. |
 |
 |
30A The V-groove material arrived, and I installed it on the back side of the kitchen island. So, as promised, I am providing a picture of it. I cut a piece to fit, and simply rounded the edge and applied a bit of stain. This made a good-looking corner without the need for any "corner moulding" (which, as I have previously suggested, makes a cabinet job look a bit amateurish). |
30B And here's the V-grooved
end cap on the bathroom, replacing the "Wood Skin" material (Figure 30) and making for a classier look. |
 |
 |
31 Here is the side of the laundry room
cabinet. I used some more of the "Wood Skin" product. Again, no moulding needed against the wall. |
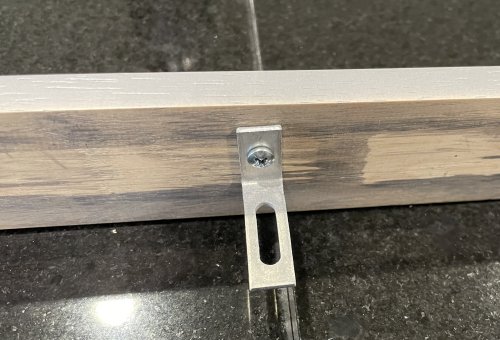
32 To mount the AWE8 moulding without using fasteners that would show, simply add an angled bracket on the back side every 2 or 3 feet. That way you can screw the bracket to the cabinet top behind the moulding. The slotted type of bracket also helps give you some "Magic Slop" in positioning the moulding (to move it forward or backward)! If you need to raise the moulding a bit, simply put a few washers under the bracket. |
 |
 |
And finally. . . some pix of the completed project
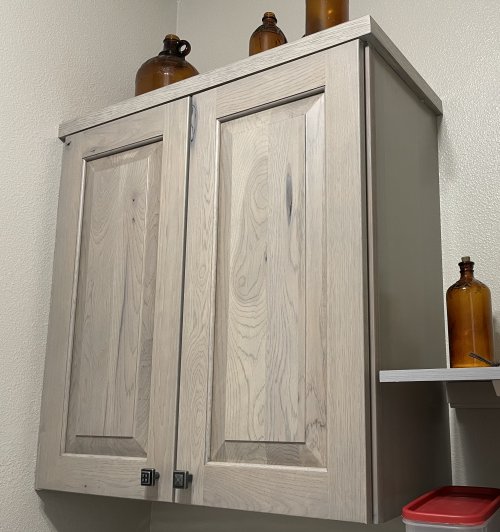
33 Here is the laundry room cabinet with its "AWE8" cap on top. |
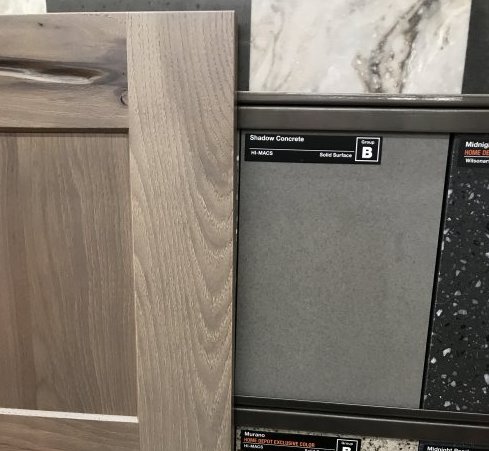
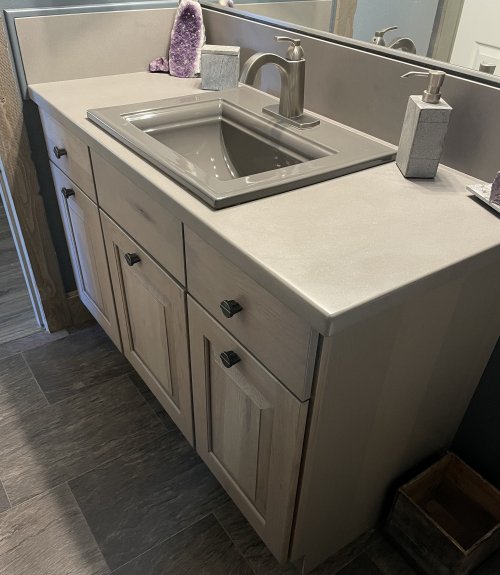
34 And here is the upstairs bath. The countertop is LG "Hi-Macs" in "Shadow Concrete". I had the countertop installed - also through Home Depot. The lavatory is a Kohler "Memoirs" in "Thunder Grey". And the faucet is a Delta "Flynn" model, in stainless. |
 |
 |
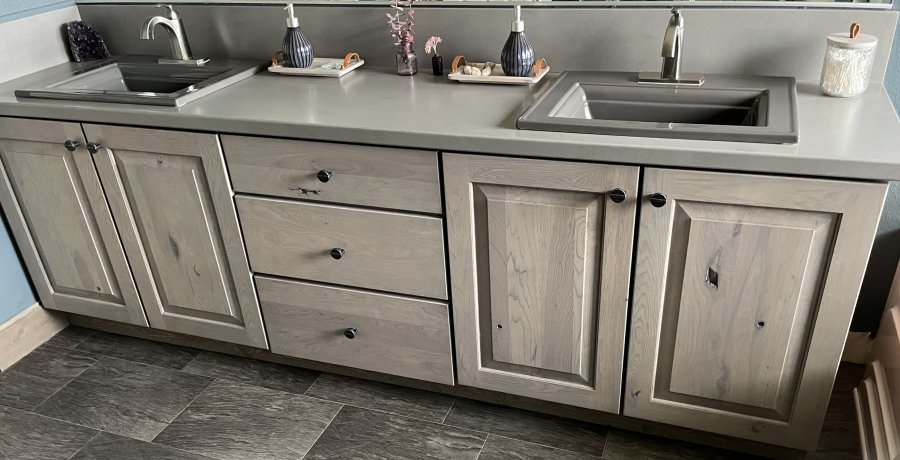
35 And here is the master bath, with a pair of Kohler Memoirs lavs. Note that this is how "Thunder Grey" really looks like, unlike picture #34 above - more lighting anomolies! |
 |
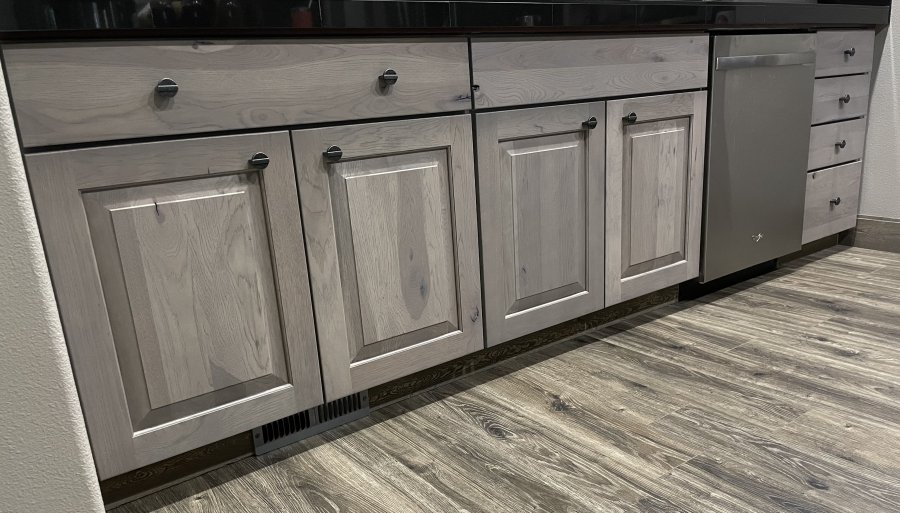
36 And here is the kitchen sink area. You can just barely see it, but I painted the HVAC outlet (near the floor under the cabinet) a Hammered Grey color - no more "Builder White"! The countertop is the original one that came with the house. |
 |
Copyright © 2021 J.A.